Managing Business Central Development with Git: Amending History

Preamble

This is the start of a series of posts about managing AL development with Git. I don’t profess to be a Git expert and much of what I write about will not exclusively apply to Business Central development. This is a collection of approaches I’ve found to be useful when it comes to managing our source code. Take what you will, discard the rest, vociferously argue with me if you feel strongly enough about it.

Preamble over. Let’s get on with it.

(Re)Writing History

My introduction to source control was using TFVC (more here). As a centralised source control system when you check code in it is immediately pushed to the server. All the changes that anyone pushes make a nice, neat, straight line. Check-ins are given a changeset number. Those numbers are unique, always increase and can never be changed. History has been written.

Some changesets in the history of a branch in TFVC

Stands to reason. We can’t go back and change the past. But what if we could…?

You can use Git like this if you want. Make a change, commit the change, make a change, commit the change. Keep committing in a straight line and keep your history really simple.

* cd03362 (HEAD -> master) Add missing caption for new field
* 94388de Populate new Customer field OnInsert
* c49b9c9 Add new field to Customer card

Unlike TFVC you have to push those commits to the server before anyone can see them. Do that on a regular basis and make sure your colleagues are pulling your changes before they commit theirs and not much can go wrong.

That’s fine as far as it goes, but it’s not particularly elegant. What about when you make another commit correcting a typo in the caption? (Reading the history from bottom to top)

* 1ee22a6 (HEAD -> master) Correct typo in caption
* cd03362 Add missing caption for new field
* 94388de Populate new Customer field OnInsert
* c49b9c9 Add new field to Customer card

Now we’ve got two commits in the history of the project just to add a caption and get the caption correct. With TFVC you’re stuck with it, but with Git, we’ve got complete control over the history of the project.

Tell a Story

Having control over the history of the project ought to make us think differently about it. What is the history for anyway? It’s to help other developers, including our future selves, understand what changes have been made to the code and why they have been made. The best way I’ve heard this described is that we can use the commits to tell the story of the changes that we’ve made.

When you were working on this feature what changes did you make? What code did you add or remove?

The reality might be something like:

  1. Added a field to the customer table
  2. Added an OnInsert trigger to populate the new field
  3. Added a missing caption
  4. Corrected a typo in the caption
  5. Added the field to the customer card
  6. Realised the field was in the wrong group, moved it
  7. Added a missing application area
  8. Realised I should have included a suffix to the field name, renamed the field

Development can be messy. We make mistakes and fix them as we go. But is that history easy to read? Do other developers care about all the steps in the process? Does future you need to reminded of all those mistakes? No. We can do better than that.

Terminal

From here on in we’re going to use a terminal – command prompt / bash / PowerShell to manipulate the history of the repository. Don’t be intimidated – it’s fine with a little practice. I’d recommend a combination of PowerShell and posh-git module – its tab completion and status in the prompt makes life easier.

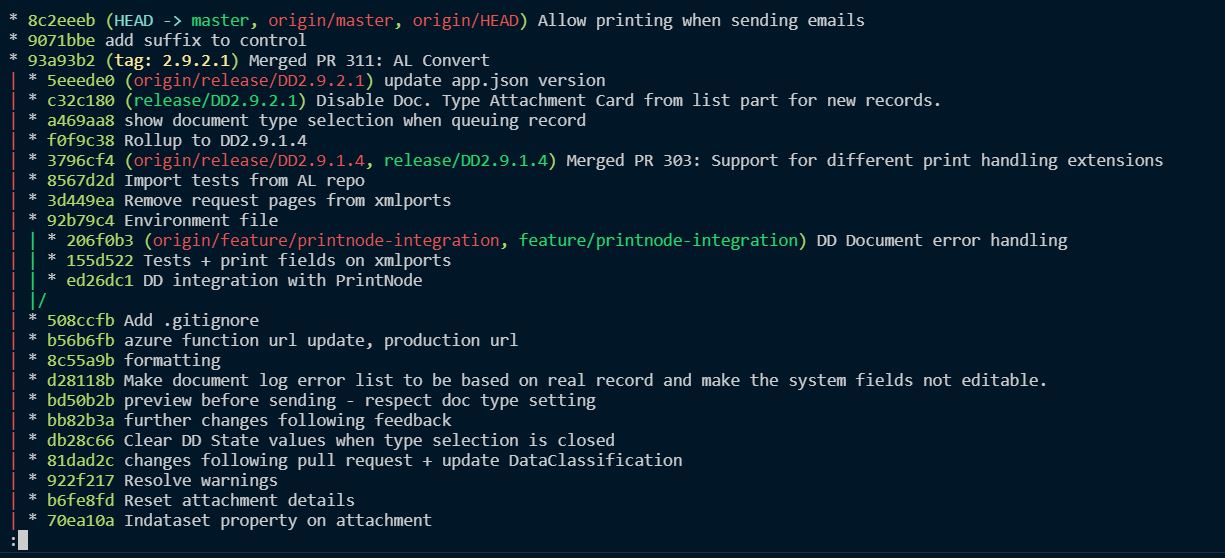
Incidentally, to show the graphs of the history in this post I’ve used:

git log --graph --oneline --all

i.e. show the log (history) of the branch as a graph with each commit on a single line.

git commit –amend

The first tool we’ve got to put some of this mess right is the –amend switch to the commit command. Perfect for when you realise you’d made a mistake with the latest commit. You’ve found a typo or forgotten to include some changes that should have been made with it.

Stage the changes that you want to include with the previous commit (using git add or VS Code or some other UI tool). Rather than committing them in the UI switch to a terminal and type git commit –amend

Amending a commit

Git will open a text file with the commit comment at the top and details of the changes which are included in the commit underneath. Change the commit comment if you want and close the file. You’ll have selected the text editor you want to use when installing Git. If you can’t remember doing that then you’ll find out what you chose now. You can change the editor in Git’s config if you like.

Congratulations. You just rewrote the history of the repo. You can do that perfectly safely on commits that are only in your local copy of the repository.

Only Share Your Changes When You’re Ready

This is one of the big benefits of a distributed source control system like Git. It’s your copy of the repo. You can do whatever you like to it without affecting anyone else until you are ready. Make mistakes. Muck about with different ideas. Start again. Redesign. Whatever.

When you are happy with the changes that you’ve made and the story that the commits tell – push those changes to the server and let your colleagues get their hands on them.

Different Versions of History

Before going on to describe other methods for manipulating history it is probably responsible to briefly discuss the consequences of rewriting commits that have been already been pushed to the server.

If this is a commit that has already been pushed to the server you should know that your history no longer matches the history on the remote.

The graph will end up looking something like this. My local copy of the commit has a different commit hash (c1152b2) to the remote copy (aea8ffa) – usually, but not necessary, called “origin”. Notice the posh-git prompt indicates this with the up and down arrows. 1 commit ahead of master, 1 commit behind master.

* c1152b2 (HEAD -> master) Correct typo in caption
| * aea8ffa (origin/master) Correct typo in caption
|/
* cd03362 Add missing caption for new field
* 94388de Populate new Customer field OnInsert
* c49b9c9 Add new field to Customer card
C:\Users\james.pearson.TECMAN\Desktop\GitDemo [master ↓1 ↑1]>

While this is the case I won’t be able to push my changes to the remote. This is what happens when I run git push

! [rejected] master -> master (non-fast-forward)
error: failed to push some refs to 'C:\users\james.pearson.TECMAN\Desktop\GitDemo-Origin.git'
hint: Updates were rejected because the tip of your current branch is behind
hint: its remote counterpart. Integrate the remote changes (e.g.
hint: 'git pull …') before pushing again.
hint: See the 'Note about fast-forwards' in 'git push --help' for details.

Updates were rejected. There is a danger that some commits on the server will be lost if my copy of the master branch is pulled as is.

The advice is to pull the commits that are on the server and incorporate them into my local copy before I push my changes again. Usually good advice. Only, in this case I want that change to be lost. The commit that is in the server’s copy but not mine is the commit that I want to overwrite. In which case, I can safely force my changes onto the server with git push -f

Before forcing your changes make sure that you know which changes are going to be lost i.e. everything from the point at which the graph diverges.

If that all sounds a little daunting, don’t do it. Practice amending local commits first and getting them into shape before you push them to the server. Being able to confidently manipulate the history of the repo with a few key commands will prove an invaluable tool in your own work and especially as you collaborate on the same code with others.

Next up, interactive rebasing.

Chaining Builds in Azure DevOps

We are triggering a lot of builds in Azure DevOps these days. If anyone so much as looks at an AL file we start a new build.

OK, that’s a small exaggeration, but we do use our build pipelines for:

  • Continuous integration i.e. whenever code is pushed up to Azure DevOps we start a build
  • Verifying our apps compile and run against different localisations (more of that another time)
  • Checking that a dependent app hasn’t been broken by some changes (what we’re going to talk about now)
  • Building our app against different upcoming versions of Business Central (this is an idea that we haven’t implemented yet)

Background Reading

If you haven’t got a clue what I’m talking about you might find a little background reading useful. These might get you started:

Overview

We’re considering a similar problem to the one I wrote about in the last post on package management – but from the other end. The question then was, “how do I fetch packages (apps) that my app depends on?” Although not explicitly stated, a benefit of the package management approach is that you’ll find out pretty quickly if there are any breaking changes in the dependency that you must handle in your app.

Obviously, you want to minimise the number of times you make a breaking change in the first place but if you can’t avoid it then change the major version no. and do your best to let any dependent devs know how it will affect them e.g. if you’re going to change how an API works, give people some notice…I’m looking at you Microsoft 😉

But what if we’re developing the dependency and not the dependent app? There will be no trigger to build the dependent app and check that it still works.

Chaining Builds

Azure DevOps allows you to trigger a new build on completion of another build. In our scenario we’ve got two apps that are built from two separate Git repositories in the same Azure DevOps project. One is dependent upon the other.

It doesn’t really matter for the purposes of this post what the apps do or why they are split into two but, for the curious, the dependent app provides a little slice of extra functionality for on-prem customers that cannot be supported for SaaS. Consequently the dependency (which has the core functionality supported both for SaaS and on-prem) is developed far more frequently than the dependent app.

Build Triggers.JPG

We want to check that when we push changes to the dependency that the dependent app still works i.e. it compiles, publishes, installs and the tests still run.

You can add a “Build Completion” trigger to pipeline for the dependent app. This defines that when the dependency app is built (filtered by branch) that a build for the dependency kicks off.

That way if we’ve inadvertently made some breaking change we gives ourselves a chance to catch it before our customers do.

Limitations

Currently the triggering and to-be-triggered build pipelines must be in the same Azure DevOps project – which is a shame. I’d love to be able to trigger builds across different projects in the same organisation. No doubt this would be possible to achieve through the API – maybe I’ll attempt it some day – but I’d rather this was supported in the UI.

An Approach to Package Management in Dynamics 365 Business Central

TL;DL

We use PowerShell to call the Azure DevOps API and retrieve Build Artefacts from the last successful build of the repository/repositories that we’re dependent on.

Background

Over the last few years I’ve moved into a role where I’m managing a development team more than I’m writing code myself. I’ve spent a lot of that time looking at tools and practices in the broader software development community. After all, whether you’re writing C/AL, AL, PowerShell or JavaScript it’s all code and it’s unlikely that we’ll face any challenges that haven’t already been faced in one way or another in a different setting.

In that time we’ve introduced:

Package Management

The next thing to talk about is package management. I’ve written about the benefits of trying to avoid dependencies between your apps before (see here). However, if app A relies on app B and you cannot foresee ever deploying A without B then you have a dependency. There is no point trying to code your way round the problems that avoiding the dependency will create.

Accepting that your app has one or more dependencies – and most of our apps have at least one – opens up a bunch of questions and presents some interesting challenges.

Most obviously you need to know, where can I get the .app files for the apps that I am dependent on? Is it at least the minimum version required by my app? Is this the correct app for the version of the Dynamics NAV / Dynamics 365 Business Central that I am developing against? Are the apps that I depend on themselves dependent on other apps? If so, where do I get those from? Is there another layer of dependencies below that? Is it really turtles all the way down?

These are the sorts of questions that you don’t want to have to worry about when you are setting up an environment to develop in. Docker gives us a slick way to quickly create disposable development and testing environments. We don’t want to burn all the time that Docker saves us searching for, publishing and installing app files before we can start work.

This is what a package manager is for. The developer just needs to declare what their app depends on and leave the package manager to retrieve and install the appropriate packages.

The Goal

Why are we talking about this? What are we trying to achieve?

We want to keep the maintenance of all apps separate. When writing app A I shouldn’t need to know or care about the development of app B beyond my use of its API. I just need to know:

  • The minimum version that includes the functionality that I need – this will go into my app.json file
  • I can acquire that, or a later, version of the app from somewhere as and when I need it

I want to be able to specify my dependencies and with the minimum of fuss download and install those apps into my Docker container.

We’ve got a PowerShell command to do just that.

Get-ALDependencies -Container BCOnPrem -Install

There are a few jigsaw pieces we need to gather before we can start putting it all together.

Locating the Apps

We need somewhere to store the latest version of the apps that we might depend upon. There is usually some central, public repository where the packages are hosted – think of the PowerShell Gallery or Docker Hub for example.

We don’t have an equivalent repository for AL apps. AppSource performs that function for Business Central SaaS but that’s not much use to us while we are developing or if the apps we need aren’t on AppSource. We’re going to need to set something up ourselves.

You could just use a network folder. Or maybe SharePoint. Or some custom web service that you created. Our choice is Azure DevOps build artefacts. For a few reasons:

  • We’ve already got all of our AL code going through build pipelines anyway. The build creates the .app files, digitally signs them and stores them as build artefacts
  • The artefacts are only stored if all the tests ran successfully which ought to give us more confidence relying on them
  • The build automatically increments the app version so it should always be clear which version of the app is later and we shouldn’t get caught in app version purgatory when upgrading an app that we’re dependent on
  • We’re already making use of Azure DevOp’s REST API for loads of other stuff – it was easy to add some commands to retrieve the build artefacts (hence my earlier post on getting started with the API)

Identifying the Repository

There is a challenge here. In the app.json file we identify dependencies by app name, id and publisher. To find a build – and its artefacts – we need to know the project and repository name in Azure DevOps.

Seeing as we can’t add extra details into the app.json file itself we hold these details in a separate json file – environment.json. This file can have an array of dependency objects with a:

  • name – which should match the name of the dependency in the app.json file
  • project – the Azure DevOps project to to find this app in
  • repo – the Git repository in that project to find this app in

Once we know the right repository we can use the Azure DevOps API to find the most recent successful build and download its artefacts.

I’m aware that we could use Azure DevOps to create proper releases, rather than downloading apps that are still in development. We probably should – maybe I’ll come back and update this post some day. For now, we find that using the artefacts from builds is fine for the two main purposes we use them: creating local development environments and creating a Docker container as part of a build. We have a separate, manual process for uploading new released versions to SharePoint for now.

The Code

So much for the theory, let’s look at some code. In brief we:

  1. Read app.json and iterate through the dependencies
  2. For each dependency, find the corresponding entry in the environment.json file and read the project and repo for that dependency
  3. Download the app from the last successful build for that repo
  4. Acquire the app.json of the dependency
  5. Repeat steps 2-5 recursively for each branch of the dependency tree
  6. Optionally publish and install the apps that have been found (starting at the bottom of the tree and working up)

A few notes about the code:

  • It’s not all here – particularly the definition of Invoke-TFSAPI. That is just a wrapper for the Invoke-WebRequest command which adds the authentication headers (as previously described)
  • These functions are split across different files and grouped into a module, I’ve bundled them into a single file here for ease

(The PowerShell is hosted here if you can’t see it embedded below: https://gist.github.com/jimmymcp/37c6f9a9981b6f503a6fecb905b03672)


function Get-ALDependencies {
Param(
[Parameter(Mandatory=$false)]
[string]$SourcePath = (Get-Location),
[Parameter(MAndatory=$false)]
[string]$ContainerName = (Split-Path (Get-Location) -Leaf),
[Parameter(Mandatory=$false)]
[switch]$Install
)
if (!([IO.Directory]::Exists((Join-Path $SourcePath '.alpackages')))) {
Create-EmptyDirectory (Join-Path $SourcePath '.alpackages')
}
$AppJson = ConvertFrom-Json (Get-Content (Join-Path $SourcePath 'app.json') -Raw)
Get-ALDependenciesFromAppJson -AppJson $AppJson -SourcePath $SourcePath -ContainerName $ContainerName -Install:$Install
}
function Get-ALDependenciesFromAppJson {
Param(
[Parameter(Mandatory=$true)]
$AppJson,
[Parameter(Mandatory=$false)]
[string]$SourcePath = (Get-Location),
[Parameter(Mandatory=$false)]
[string]$RepositoryName,
[Parameter(Mandatory=$false)]
[string]$ContainerName,
[Parameter(Mandatory=$false)]
[switch]$Install
)
foreach ($Dependency in $AppJson.dependencies) {
$EnvDependency = Get-DependencyFromEnvironment -SourcePath $SourcePath -Name $Dependency.name
$Apps = Get-AppFromLastSuccessfulBuild -ProjectName $EnvDependency.project -RepositoryName $EnvDependency.repo
$DependencyAppJson = Get-AppJsonForProjectAndRepo -ProjectName $EnvDependency.project -RepositoryName $EnvDependency.repo
Get-ALDependenciesFromAppJson -AppJson $DependencyAppJson -SourcePath $SourcePath -RepositoryName $RepositoryName -ContainerName $ContainerName -Install:$Install
foreach ($App in $Apps) {
if (!$App.FullName.Contains('Tests')) {
Copy-Item $App.FullName (Join-Path (Join-Path $SourcePath '.alpackages') $App.Name)
if ($Install.IsPresent) {
try {
Publish-NavContainerApp -containerName $ContainerName -appFile $App.FullName -sync -install
}
catch {
if (!($_.Exception.Message.Contains('already published'))) {
throw $_.Exception.Message
}
}
}
}
}
}
}
function Get-AppJsonForProjectAndRepo {
Param(
[Parameter(Mandatory=$true)]
[string]$ProjectName,
[Parameter(Mandatory=$false)]
[string]$RepositoryName
)
$VSTSProjectName = (Get-VSTSProjects | where name -like ('*{0}*' -f $ProjectName)).name
$AppContent = Invoke-TFSAPI ('{0}{1}/_apis/git/repositories/{2}/items?path=app.json' -f (Get-TFSCollectionURL), $VSTSProjectName, (Get-RepositoryId -ProjectName $VSTSProjectName -RepositoryName $RepositoryName)) -GetContents
$AppJson = ConvertFrom-Json $AppContent
$AppJson
}
function Get-DependencyFromEnvironment {
Param(
[Parameter(Mandatory=$true)]
[string]$SourcePath,
[Parameter(Mandatory=$true)]
[string]$Name
)
Get-EnvironmentKeyValue -SourcePath $SourcePath -KeyName 'dependencies' | where name -eq $Name
}
function Get-EnvironmentKeyValue {
Param(
[Parameter(Mandatory=$false)]
[string]$SourcePath = (Get-Location),
[Parameter(Mandatory=$true)]
[string]$KeyName
)
if (!(Test-Path (Join-Path $SourcePath 'environment.json'))) {
return ''
}
$JsonContent = Get-Content (Join-Path $SourcePath 'environment.json') -Raw
$Json = ConvertFrom-Json $JsonContent
$Json.PSObject.Properties.Item($KeyName).Value
}
function Get-VSTSProjects {
(Invoke-TFSAPI -Url ('{0}_apis/projects?$top=1000' -f (Get-TFSCollectionURL))).value
}
function Get-RepositoryId {
Param(
[Parameter(Mandatory=$true)]
[string]$ProjectName,
[Parameter(Mandatory=$false)]
[string]$RepositoryName
)
$Repos = Invoke-TFSAPI ('{0}{1}/_apis/git/repositories' -f (Get-TFSCollectionURL), $ProjectName)
if ($RepositoryName -ne '') {
$Id = ($Repos.value | where name -like ('*{0}*' -f $RepositoryName)).id
}
else {
$Id = $Repos.value.item(0).id
}
if ($Id -eq '' -or $Id -eq $null) {
$Id = Get-RepositoryId -ProjectName $ProjectName -RepositoryName ''
}
$Id
}

VS Code, PowerShell & Git: 5 Things

Visual Studio Code has moved quickly from “what’s that? Part of Visual Studio? No? Then why did they call it that?” to become the hub of much of my daily work. This post contains a few of the things (5 to be precise) that I’ve done to make it work better for me. Maybe you can glean something useful. Maybe you can teach me something about how you use it – post a comment.

Extensions

You can use VS Code to write JavaScript, C#, CSS, HTML and a raft of other languages, use its native support for Git and install extensions for AL (obviously), developing Azure Functions, integrating with Azure DevOps, managing Docker, writing Power Shell, adding support for TFVC…

Beautiful.

Having said that, I’m not a big fan of having lots of extensions that I only occasionally use. I’m pretty ruthless in uninstalling stuff I’m not using in Chrome and Android. VS Code is the same. If I don’t use it all the time I generally go without it. (For those of us that make apps for a living it’s a sobering thought that our prospective users are likely to be the same).

Right now I’ve got these extensions installed:

  • AL Language – every so often I need an upcoming version or a NAV 2018 version but most of the time I’ve got the one from the marketplace installed
  • Azure Account – provides some sign in magic required by other extensions
  • Azure Functions – like it sounds
  • Azure Pipelines – intellisense for YAML build definitions
  • CRS AL Language Extensions – for renaming AL files to follow best practices and because I don’t like the convention. Including the object type when the files are already in subfolders by object type and including objects IDs when we all agree we want to get rid of them and don’t care what they are as long as they’re unique seems pretty redundant to me…but I digress
  • GitLens – add blame annotations i.e. “how did this line of code get here”, file history, compare revisions, open the file in Azure DevOps
  • PowerShell – like it sounds
  • Night Owl – a theme. Because we can! Having suffered for years with an IDE that didn’t even highlight keywords I took my time trying out different themes. I like a dark theme but didn’t quite get on with the one that comes with VS Code.

Terminal

VS Code has a built in terminal. I use PowerShell a lot during the day to manage containers (with the navcontainerhelper module), manage Git and various tasks with our own module to call the with Azure DevOps REST API. It’s nice to also be able to do all that from within VS Code.

These ideas aren’t strictly to do with VS Code, but tweaking PowerShell and Git to make them more efficient for you.

Run as Administrator

If you’re going to use the terminal to manage docker containers you’re going to want to run VS Code (and therefore the terminal) as administrator.

You can set this in the Advanced section of the properties of the shortcut. This will force VS Code to always open as admin.

VS Code Shortcut Properties.JPG

I believe Freddy K is working on some changes to the navcontainerhelper module that will remove the requirement to run the cmdlets as admin. That would be nice.

PowerShell Profile

Have PowerShell automatically execute some script on loading by editing your profile. PowerShell has a built-in $profile variable which points to the location of your .ps1 profile file.

I use that file to import the posh-git module (below) and our own TFS Tools module. You could create the file with something like this (sc is an alias for the Set-Content command):

sc $profile 'Import-Module posh-git
Write-Host "PowerShell Ready" -ForegroundColor Green'

Opening a new terminal will look like this:

VS Code Terminal PowerShell Ready.JPG

Note: PowerShell ISE has a different profile file to PowerShell.

Posh-Git

I mostly use Git from the command line. I started using the command line rather than a GUI as I found it helped me understand what commands are actually being used – how fetch is different to pull, how to set tracking information for a branch or edit a remote.

And yes, perhaps there is small part of it that boosts my shallow sense of “I’m a real developer, I type weird commands into a prompt rather than clicking a button on a GUI”. It’s OK to admit that. I draw the line at Vim though.

Anyway.

If you’re planning on using Git in PowerShell you’re going to want to install the posh-git module.

Install-Module posh-git

It adds some details into the prompt (see above): the branch that you are on, how it compares to the remote branch that it is tracking and the status of your index. It adds tab completion all over the place as well – indispensable.

Git Aliases

If you do start using Git from the terminal you’re probably going to find typing some of the longer commands quite tedious. For instance, git log –graph is great to get an overview of your project and has loads of switches to alter its output. I tend to use:

git log --graph --oneline --all

To show a graph of all the branches (remote as well as local) with commit details on a single line each.

Git Log Graph Oneline.JPG

It gets you something like the above. You can see the commits that each of the branches is pointing at, which branches commits are included in and how work has been merged over time.

I don’t want to type the full command out each time though. Fortunately, Git doesn’t force you to. You can create an alias. I have:

  • git lol – to show the above graph
  • git fap – to fetch all changes from the remote and prune any references to remote branches that no longer exist (I’ve never understood why Git doesn’t automatically remove references to remote branches that no longer exist)
  • git pff – pull and merge changes from the remote branch, as long as your branch can be fast-forwarded

Conclusion

There are lots of opportunities – more than 5 – to enhance and tune VS Code and PowerShell to make your daily work more efficient. Check it out.

Source Code Management: Conclusions

I stated in the first post in this series that I wasn’t going to offer any advice. I will, however, attempt to draw some conclusions from our experiences and hope that you’ll find them helpful, or at least interesting.

(Not) Migrating to Git

A few months before we trialled Git in earnest as a team I tried it out for myself. I had a look because I’d heard various reasons that we should migrate:

  • “It’s faster” – yes, in my experience all the key operations are faster in Git than TFVC (committing vs. checking-in, cloning vs. getting latest version, viewing differences between versions)
    • Is that a compelling reason in itself to migrate? You can be the judge of that
  • “Microsoft are moving to it themselves” – who cares? Do you have the same requirements as Microsoft?
    • This would only be a valid argument if they stopped supporting TFVC. As far as I can see they are adding support for more version control systems not removing them (the Build system can now retrieve code from Subversion)
  • “VS Code has built in support for Git” – true, which is great.
    • You can add support for TFVC through a VS Code extension published by Microsoft
    • Again, you can decide how important the convenience of having support for Git in your IDE is weighed against other factors
    • Having tried a few GUIs for Git, VS Code is not my personal favourite – Git Extensions is

I decided at the time that we didn’t need to migrate to Git. The benefits didn’t outweigh the challenges in having the team learn a new system and migrate to it in my estimation. This was during the days of us developing in a central NAV development database (more on that here).

Moving to a distributed version control system while we were working in a single development database didn’t seem to make a lot of sense and I figured that our development practice should drive our choice of version control – not the other way round.

Migrating to Git

All of that said, now that we have migrated to Git I can’t imagine going back to TFVC. Some of our key experiences and learning points:

  • Git has a steeper learning curve. Getting your head round cloning the entire repository, how branches work, pushing, fetching and pulling changes – it’s all a little more involved than TFVC
  • It’s worth investing the time to understand the core concepts. I watched many hours of YouTube videos about Git and read lots of blogs – you can use Git as centralised version control (by pushing to the remote every time you commit) but you’re missing most of the power if you do
  • Personally, I forced myself to use the command line rather than a GUI for common tasks – this helped me grasp what the commands were actually doing and how they can be manipulated in different situations. That knowledge will come in handy when someone in your team asks why their rebase has resulted in a conflict and how to fix it
  • We create a lot of branches now, because it’s so easy and because we use pull requests (see below)
  • Git gives you much finer control over the repositories and your commits than TFVC: interactive rebasing, resetting, reverting, cherry-picking, squashing, fixing, amending commits – with a little practice and research (see above) there aren’t really any ways to screw up the repository so badly that you can’t clean it up again
  • The complexity that makes Git harder to get started with also makes it very flexible and powerful
  • Did I mention that pull requests are awesome? The tools to collaborate on code in Azure DevOps have revolutionised our development workflow. We got started with code review in TFVC but moving to Git has allowed us to move on to another level

At the End of the Day

At the end of the day, source code management is a tool to help us turn out working software for our customers. Different dev teams use different systems in different ways. That’s because they have different development practices and procedures.

However, I think it’s fair to say that we’ve found source code management is not a substitute for good process. Implementing it was initially difficult because we weren’t following a consistent, disciplined development process. It was clear that we weren’t going to be able to extract much value from our system until we were.

As we have changed, and sought to improve our process over the years we have changed our system to suit, which feels like the right way round to me.