Getting Started with Git Hooks

Git hooks have been on my “to mess about with and learn a little some day” list for a while. It’s the old conundrum: I might use them if I knew what they could do, but I’m not going to learn about them until I’ve got a use for them. Chickens-and-eggs for developers.

The Problem

Until recently, that is. I wondered:

What is the best way to save a different launch configuration in VS Code for each branch in my repo?

Why would I want to do that? We have branches for versions of our apps compatible with BC14, 15 and 16. I’ve got separate Docker containers of each of those versions to develop and test against. I need to change the launch config when I want to test in another container. Not a great hardship admittedly, but it would be nice to automate somehow.

Source Control?

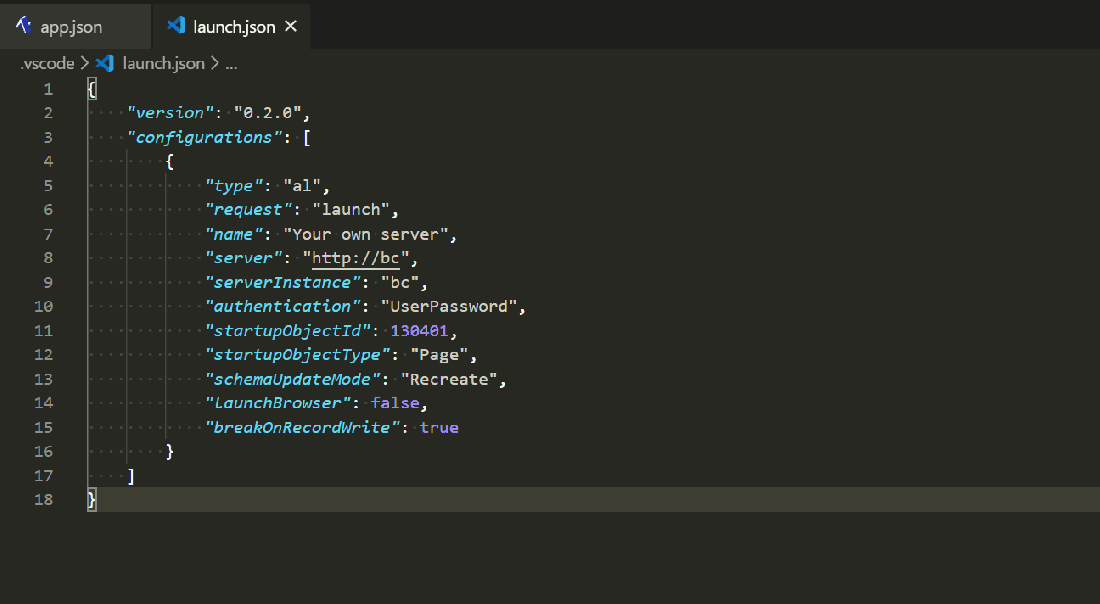
I could of course just source-control the launch.json file and commit the relevant changes to each branch. I don’t like that though. We ignore the .vscode folder in .gitignore. To my mind anything that happens in that folder is for the benefit of the local development environment. No one else cares what my launch config is – they’ll be pushing code to their own Docker containers or to SaaS sandboxes.

I suppose you could have some local commits that include the launch.json file that you don’t push to the server. Sounds horrible to manage though. Don’t do that.

So we want something that is related to source control – we want a launch config per branch – but doesn’t involve actually committing the config file. Enter hooks.

Hooks

Hooks are points in the Git workflow at which you can execute a custom script. Some are executed server-side, some client-side. You can read the documentation at https://git-scm.com/book/en/v2/Customizing-Git-Git-Hooks

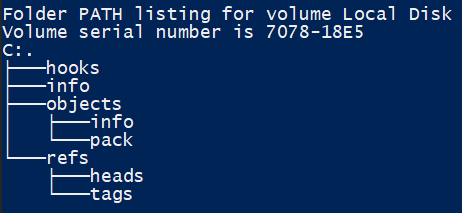
When a Git repo is initialised a .git folder is created which contains all the version history of the repo and Git’s guts. If you’re curious to learn more about how Git actually works have a browse through these folders. You might want to load up a presentation on the subject as well – like this: https://www.youtube.com/watch?v=ig5E8CcdM9g

You’ll notice that one of the folders is called hooks. This contains some sample hook files which you can take a look through. The .sample file type stops them from actually doing anything but you get a flavour of what’s possible and how you can use them.

Post-Checkout Example

For our example we’re going to want to use the post-checkout hook. This allows us to create a script that Git will execute after a checkout command. (Side note: I tend to use the integrated terminal in VS Code to execute Git commands, including checking out branches but this hook is also executed if you switch branches with the UI).

First, post-checkout isn’t one of the samples that is created when you init a new repo. You can copy the post-update.sample file instead and rename it to post-checkout (no file extension).

Writing the Hook

Okay…so what are we supposed to put in this file? Can we just start typing PowerShell? Erm…no, we can’t. The file looks distinctly Linuxy…*shudder* I’ve got nothing against Linux, I just have next to no idea what I’m doing.

The top line of the file indicates the language that you are going to script in. It’s possible to use Perl, Python, Ruby and a bunch of other stuff, including PowerShell. I won’t pretend to really know what I’m talking about but there is an useful thread on Stack Overflow on the topic.

#!/bin/sh

It is possible to write PowerShell directly into the hook file, but from what I’ve read it seems you need PowerShell Core to run it. I’ve settled for this:

#!/bin/sh

c:/Windows/System32/WindowsPowerShell/v1.0/powershell.exe -File '.git\hooks\post-checkout.ps1' $1 $2 $3

Call powershell.exe to execute the .git\post-checkout.ps1 file and pass it the three parameters that have been received. Great. How do we know that there are three parameters? And what are they? You can read the documentation here: https://git-scm.com/docs/githooks#_post_checkout

The parameters are:

  • The previous HEAD (the commit that we’ve come from)
  • The new HEAD (the commit that we’ve just checked out)
  • A flag to indicate whether a branch was checked out (it has a value of 1 if it was)

Writing the Script

Now we’re getting somewhere.

The plan is:

  • Save the launch configuration as it stands for the branch that we are coming from
  • Find a saved launch configuration for the branch that we have moved to and overwrite launch.json

What Branch Have We Come From?

This is a subtler question than we might have expected. The parameter that Git passes is the hexadecimal hash of the commit that was previously checked out. Some jumble of numbers and letters that is integral to how Git works but probably meaningless to the developer. We need to convert that hash into a branch. Or branches – potentially more than one branch might be pointing at that commit.

git branch --points-at <commit hash>

The above command will give us zero or more branches that are pointing at a given commit. Note that the current branch is denoted with an asterisk which we’ll need to trim off the front of the name.

Which Branch Have We Moved To?

We can find the name of the new, current branch with:

git branch --show-current

Finally, branch names can contain characters that cannot be used in filenames. Specifically we use forward-slashes a lot in our branch names. I’ve got a Convert-BranchToFileName function to clean it up.

Putting all the jigsaw pieces together this is the content of my post-checkout.ps1 file (which is in the .git\hooks directory).

[CmdletBinding()]
param (
    $PreviousHead,
    $NewHead,
    $BranchCheckout
)

function Convert-BranchToFileName() {
    param(
        $branch
    )

    $filename = $branch
    if ($branch.StartsWith('*')) {
        $filename = $branch.Substring(2)
    }

    $filename = $filename.Split([IO.Path]::GetInvalidPathChars()) -join ''
    return $filename.Trim()
}

if (!(Test-Path '.vscode\launch')) {
    New-Item '.vscode\launch' -ItemType Directory | Out-Null
}

$branches = git branch --points-at $PreviousHead
foreach ($branch in $branches) {
    if (Test-Path '.vscode\launch.json') {
        $filename = Convert-BranchToFileName $branch
        Copy-Item '.vscode\launch.json' ".vscode\launch\$filename.json" -Force
    }
}

if ($BranchCheckout -eq 1) {
    $newBranch = git branch --show-current
    if (Test-Path ".vscode\launch\$(Convert-BranchToFileName $newBranch).json") {
        Copy-Item ".vscode\launch\$(Convert-BranchToFileName $newBranch).json" '.vscode\launch.json' -Force
    }
}

Result

The result is something like this. When I checkout a new branch launch.json is copied to .vscode\launch\<branchname>.json and the saved json file matching the new branch name overwrites launch.json

A pretty trivial example you might argue – and you’d be right – but hopefully enough to demonstrate some of the possibilities. More useful examples might include:

  • Cleaning up the source directory between checkouts e.g. deleting .app files from previous builds or removing duplicate apps in the .alpackages folder
  • Checking Git configuration before committing e.g. is the email address that will be associated with the commit in an acceptable format e.g. does it make a particular regex pattern?
  • Enforcing some policy about compile errors or warnings before a new commit is made
  • Use your imagination…

Managing Business Central Development with Git: Platforms

Another post about Business Central development and Git. Maybe the last one. Who knows?

Whatever your precise circumstances, if you are developing apps for Business Central you have to be mindful of the differences between BC versions and how it affects your app. If you are only developing for SaaS you might only care about the current and next version.

If you are developing and maintaining apps for the on-prem/PaaS market then likely you need to concern yourself with a wider range of BC versions. Even a we-only-support-Business-Central-and-not-NAV stance means we are now supporting four major versions – 13, 14, 15 and 16. I refuse to call the versions “Business Central <Year> <Spring Release/Fall Release/Wave One/Wave Two> – a number makes much more sense to me. Also, I’m British – “fall” is an accident, not a season.

Nomenclature aside, all of this does present us with a challenge. How do we maintain the source code for our apps, for different Business Central versions, in an efficient manner?

Changes Between Versions

For the uninitiated, what sorts of changes are we talking about between platform versions? There are various things to think about:

  • Runtime differences e.g. new mandatory properties in app.json
    • contextSensitiveHelp
    • target – using “Cloud” instead of “Extension”
    • dependencies – using “id” instead of “appId”
    • depending on the “System Application” and “Base Application” apps rather than using the application property
  • Standard fields that have recently been converted to enums
  • Standard functionality that has been moved, methods that have new signatures

And of course, many of you will have experienced the pain of the BC14 -> BC15 upgrade. TempBlob, Base64, Languages, Tenant Mgt. / Environment Info, Calendar Management – all breaking changes. Microsoft were criticised, rightly so, for breaking BC14 compatible apps so badly in BC15.

To their credit, however, Microsoft said that they would minimise future breaking changes, instead marking code as becoming obsolete for at least 12 months until it is removed. That has been borne out with the release of BC16. All but one of our BC15 apps works without any changes in BC16. The exception was an app that was using the Sorting Method on Warehouse Activity Header which has been converted from an option to an enum and now has different values. Microsoft sent me an email with the details of the compilation error.

Strategy

How to manage this then? When we first switched from developing AL apps on NAV2018 (don’t – it’s more trouble than it’s worth) to BC13 we created a new Git repo for each app. It became obvious that we don’t want to keep doing that. We don’t want as many repos as number of apps * number of supported BC versions. We need something smarter than that.

We’ve settled on something like this instead:

  • the master branch has the stable code for the current release of BC (as of this week, BC16), app.json has a platform value to match the latest version (16.0.0.0) and is built against the current Docker image (mcr.microsoft.com/businesscentral/sandbox)
  • new development is done against the current BC (worldwide) version in release, bug, and feature branches (as described here)
  • the code for each version of BC that we are supporting is in a BC13, BC14 or BC15 branch – this branch has an appropriate platform value in app.json and is built against a sandbox Docker image of that version

Imagine a repo like this:

* 3b6ba3c (HEAD -> BC14) Env. Info changes for BC14
* 5e3fda6 TempBlob changes for BC14
* 0f85829 Update Docker image for BC14
* e4fe665 app.json for BC14
| * 517615b (BC15) Update Docker image for BC15
| * e893e39 app.json for BC15
|/
* 60fe758 (tag: 1.1.0, master) Some changes for v1.1.0
* 8bd6f26 (tag: 1.0.0) Initial version

The current version of our app is 1.1.0 and we are supporting the current version of BC (BC16, in the master branch) and BC15 and BC14 in their respective branches. Revisiting an earlier idea, I like to think of these branches as telling a story, answering the question – “what changes do you have to make to the current version of the code to make it compatible with this version of BC?” For BC15 the answer is “not much” – just change app.json and the Docker image. For BC14 the answer is likely to be somewhat longer.

Now we are going to work on the next version of our app, v1.2.0. These changes would go through feature branches, pull requests, a release branch and eventually into master. I’ll skip all that and just show a new commit in the master branch.

* cd7b2ff (HEAD -> master, tag: 1.2.0) Changes for v1.2.0
| * 3b6ba3c (BC14) Env. Info changes for BC14
| * 5e3fda6 TempBlob changes for BC14
| * 0f85829 Update Docker image for BC14
| * e4fe665 app.json for BC14
|/
| * 517615b (BC15) Update Docker image for BC15
| * e893e39 app.json for BC15
|/
* 60fe758 (tag: 1.1.0) Some changes for v1.1.0
* 8bd6f26 (tag: 1.0.0) Initial version

Pushing those changes to the master branch triggers a build against BC16. Now, we want to include the 1.2.0 changes in the BC15 and BC14 versions of our app. We can simply rebase the BC15 and BC14 branches back on top of the master branch.

* f4a7d9b (HEAD -> BC14) Env. Info changes for BC14
* dd072ea TempBlob changes for BC14
* ad8905b Update Docker image for BC14
* 184001e app.json for BC14
| * 71140f4 (BC15) Update Docker image for BC15
| * 2981c4d app.json for BC15
|/
* cd7b2ff (tag: 1.2.0, master) Changes for v1.2.0
* 60fe758 (tag: 1.1.0) Some changes for v1.1.0
* 8bd6f26 (tag: 1.0.0) Initial version

(Force) Pushing the changes to the BC15 and BC14 branches will trigger new builds of the app against their respective Docker images.

Depending on what the v1.2.0 changes actually were, we may need to do some more work in the BC14 branch to make the new code compatible e.g. if the new code included some use of the TempBlob codeunit.

* ff1455b (HEAD -> BC14) More TempBlob changes
* f4a7d9b Env. Info changes for BC14
* dd072ea TempBlob changes for BC14
* ad8905b Update Docker image for BC14
* 184001e app.json for BC14
| * 71140f4 (BC15) Update Docker image for BC15
| * 2981c4d app.json for BC15
|/
* cd7b2ff (tag: 1.2.0, master) Changes for v1.2.0
* 60fe758 (tag: 1.1.0) Some changes for v1.1.0
* 8bd6f26 (tag: 1.0.0) Initial version

Going back to the idea of the BC14 branch telling a coherent story of making the app compatible with BC14, does it make much sense to have two commits of TempBlob changes? No. It doesn’t add anything for a developer looking at the repo in the future. We can sort that with an interactive rebase: git rebase -i master

pick 184001e app.json for BC14
pick ad8905b Update Docker image for BC14
pick dd072ea TempBlob changes for BC14
pick f4a7d9b Env. Info changes for BC14
pick ff1455b More TempBlob changes

Change the rebase script to tell Git to “fixup” the second TempBlob change into the first.

pick 184001e app.json for BC14
pick ad8905b Update Docker image for BC14
pick dd072ea TempBlob changes for BC14
fixup ff1455b More TempBlob changes
pick f4a7d9b Env. Info changes for BC14

Those changes will be melded together and keep the history of the repo neat and readable.

Managing Business Central Development with Git: Branching Strategy

The last few posts have been about manipulating the history of your Git repository, getting comfortable tools like rebase, reset, cherry-pick and commit –amend. That’s all geared towards trying to create a history which is more than just a record of stuff that happened but tells a story of the development of your app that is useful for your colleagues and your future self.

This post is on the same theme but we’re talking about your branching strategy. Remember one of the strengths of Git is how easy it is to create branches to isolate pieces of development from each other. That’s an awesome tool – but how do we make best use of it?

When is it useful to separate pieces of development from each other in different branches? How and when do you stick the pieces of the jigsaw back together again?

Options

As you’d expect there are a lot of different approaches and no shortage of people online supporting each one. Here are some popular options. I won’t attempt to critique them because we haven’t tried them all and because you can read, try them out for yourselves and form your own opinions.

Git Flow

https://nvie.com/posts/a-successful-git-branching-model/

This approach has a “develop” branch alongside master and feature branches which are used to manage the work in progress before they are merged back to master only when they are ready to be released.

GitHub Flow

https://guides.github.com/introduction/flow/

As with Git Flow, work in progress changes are isolated in their own branches. Unlike Git Flow they are merged directly back into master once they have been reviewed and are ready to go.

Trunk Based Development

https://trunkbaseddevelopment.com/

The key idea is to avoid having long-lived branches other than the trunk (master) branch. Development can be done against other branches but only to facilitate code review and discussion. Changes should be committed to master at least every 24 hours.

Considerations

As before adopting any tool or practice we need to think about our particular circumstances and needs. What are we actually trying to achieve? By all means read about what other people are doing. If you keep reading I’ll share what we’re (currently) doing but you should think about your own requirements, decide on something that makes sense for you and be prepared to improve it in future.

I think there is something to learn from each of the strategies I’ve linked to.

App Development

We are developing apps for Business Central either to be deployed via AppSource or installed through our partners on-premise to their customers. Either way, making a new version of our app available to our customers is not a trivial exercise.

When we submit a new version of our app it is typically at least 3 or 4 working days until it is available in AppSource. For on-prem customers we are reliant on our partners to upgrade the apps manually. Neither of these scenarios exactly falls into the ideal “continuous deployment” category. Some branching strategies are geared towards getting code into master as soon as possible so it can be pushed to the production environment each day, or even multiple times a day.

However attractive that might sound that is just isn’t reality for us – at least not yet. We’re due to be getting an API for pushing updates to AppSource, which is great, but as long as it is backed by a manual certification process I can’t see Microsoft thanking us for pushing multiple updates each day.

Given the lead time to getting a release live we should be quite careful about what is going to go into each one. We don’t really have the luxury of pushing an update immediately after another because we forgot to include something.

#1 Create a Release Branch

We start by creating a release branch. This is where we are going to collect all the changes that should be included in the next release before they are merged into the master branch. We do occasionally bundle in last minute changes and fixes to a release but we ought to have a pretty clear idea of what the release will include before we start.

Imagine we’ve got this repo. All of the commits are merged into the master branch which is tagged with 1.0.0. Tags are useful additional pointers to particular places in the history of the repo. In future if we want to see the code as it was in v1.0.0 we can just run git checkout 1.0.0

* 3894d1a (HEAD -> master, tag: 1.0.0, origin/master) Correct typo in caption
* cd03362 Add missing caption for new field
* 94388de Populate new Customer field OnInsert
* c49b9c9 Add new field to Customer card

Now create a new branch to use as our release branch. For now this just points to the same commit as master.

git branch release/1.1.0

#2 Create Individual Feature and Bug Branches

Now we’ll create separate branches for each feature or bug fix that we’ve decided to include in release 1.1.0. Why not just do all the changes we need in the release branch? Because we want to be able to develop and test them separately from each other.

* 381c83d (HEAD -> bug/commission-calc) Fix rounding error in commission calc
| * e9d31b4 (feature/sales-report) Action to open sales report from customer
| * 78102dd Sales report
|/
| * c450814 (feature/sales-price-calc) Prices in non-base UOM
| * dd5f6c0 Prices in additional currencies
| * 02fa619 Pricing elements per item
|/
* 3894d1a (tag: 1.0.0, origin/master, release/1.1.0, master) Correct typo in caption
* cd03362 Add missing caption for new field
* 94388de Populate new Customer field OnInsert
* c49b9c9 Add new field to Customer card

The graph might look something like this now. Separate branches with one or more commits in each. Incidentally, naming the branches feature/* and bug/* is just a convention – it doesn’t have any affect on how they are managed.

#3 Create Pull Requests and Complete Quickly

When each feature or bug fix is ready for review and testing we create a pull request targeting the release branch. Pull requests in Azure DevOps are great. However, in my experience there are two main things that make pull requests less great, or even bad.

  1. Bundling too many changes in a single pull request
  2. Leaving them open for too long

Having lots of changes makes it difficult to review and test those changes. Which means no one is enthusiastic to do it. Which means it gets left open for a long time.

Leaving pull requests open for a long time means people forget what the changes were for and whether they have already been tested. It becomes a burden that no one wants to take responsibility for. Eventually someone completes it because we’re all sick of seeing it on the list. Not an ideal reason to complete it.

We’ve got a couple of measures on our team dashboard – number of open pull requests and average age of those requests in days. If the average age is creeping over 7, say, then we’re likely doing something wrong.

We squash the commits when the pull request is completed. Like it sounds, that squashes all of the changes that are in the feature or bug branch into a single commit which is added to the release branch. We lose some of the history doing this but I think it makes it more readable later on. We are rarely interested in the details of how we wrote a certain feature – just that we did, and these were the changes that we made.

* 35cf673 (HEAD -> release/1.1.0) Merged PR 03: Commission Calc
* b23b8c5 Merged PR 02: Sales Report
* 8007dcf Merged PR 01: Sales Price Calc
| * 381c83d (bug/commission-calc) Fix rounding error in commission calc
|/
| * e9d31b4 (feature/sales-report) Action to open sales report from customer
| * 78102dd Sales report
|/
| * c450814 (feature/sales-price-calc) Prices in non-base UOM
| * dd5f6c0 Prices in additional currencies
| * 02fa619 Pricing elements per item
|/
* 3894d1a (tag: 1.0.0, origin/master, master) Correct typo in caption
* cd03362 Add missing caption for new field
* 94388de Populate new Customer field OnInsert
* c49b9c9 Add new field to Customer card

Here is the graph now. I’ve removed the remote branches to keep it simpler. Notice the “Merged PR” commits which have been created by completing the pull requests. I’ve still got local branches with the individual changes. These can now safely be deleted now that those changes have been squashed into the release branch.

#4 Merge into Master and Tag

Each push to the server triggers a pipeline to compile the code and run the tests. Assuming those builds are passing and with the manual testing that we’ve done we ought to be confident that the changes work as expected. Each time we complete a pull request it runs a build incorporating the other completed changes. If that passes as well then we’re ready to merge the changes into master, delete the release branch and tag the new version as 1.1.0

* 35cf673 (HEAD -> master, origin/master, tag: 1.1.0) Merged PR 03: Commission Calc
* b23b8c5 Merged PR 02: Sales Report
* 8007dcf Merged PR 01: Sales Price Calc
* 3894d1a (tag: 1.0.0) Correct typo in caption
* cd03362 Add missing caption for new field
* 94388de Populate new Customer field OnInsert
* c49b9c9 Add new field to Customer card

The end result – at least what we’re aiming for – is a neat summary of the changes that have been made between the two versions. We can see the changes which we made for each feature or bug fix in those commits. If we want more detail we can always go back and view the completed pull request on Azure DevOps.

In a future post we’ll think about how to manage different versions of the code for different versions of Business Central.

Further Reading

Check out Michael Megel’s post on the same topic here: https://never-stop-learning.de/branching-workflow-ci-cd-part-6/

Managing Business Central Development with Git: Branches

Obligatory Preamble

I wasn’t really intending to write this post. If you want training materials for learning the basic concepts of Git then there is tonnes of great free content around on blogs and YouTube channels. I was going to share some thoughts about our branching strategy but thought I’d write a little about manipulating branches first.

Amble

When I was new to Git and trying to establish whether it was worth the time and effort migrating from TFVC I heard a lot about branches. “Migrate to Git” they said. “Branching is so cheap”. What on earth does that mean?

In TVFC, creating a branch of your source code involves creating an entire copy of the working folder, with all of its contents. Conceptually this is nice and easy. If you want to work in another branch then you work in another folder. Changes in different branches are isolated from each other in separate folders.

In performance terms though, not so great i.e. “expensive”. Especially when we were working with 5K+ CAL object text files. Creating a copy of all those files and downloading from the server took some time. Visual Studio would complain that I had more than 100K files under source control – which should be OK…but do you really need all of these it would complain?

Git’s approach to branches is very different. You can think of them as just labels that point at a given commit in the graph. Creating a new branch is just a case of creating a new label, a tiny new text file in the .git directory.

* 825e0ac (HEAD -> feature/some-great-new-feature) Vehicles
* 45494f5 Bookings
* d80589c Ranger table and page
* 440e851 Animal table and page
| * 1225ee5 (bug/some-bug-fix) Fix sales order posting bug
|/
| * 5025f76 (feature/new-field-on-sales-docs) Add field to Order Confirmation
| * 367faab Set field on customer validation
| * 91a9252 Add field to Sales Header
|/
* 3894d1a (origin/master, master) Correct typo in caption
* cd03362 Add missing caption for new field
* 94388de Populate new Customer field OnInsert
* c49b9c9 Add new field to Customer card

There are 12 commits in this repository. Each commit is a snapshot of the status of the entire source code – the accumulation of all the changes up to that point. The four (local) branches are just pointers to different places in the graph. HEAD just indicates the point at which a new commit will be added i.e. this commit will become the parent of the next commit you make.

Conceptually a little harder to get your head around – but so much more elegant and powerful. You have a single working folder, the contents of which reflect the branch that is currently checked-out. You can quickly and easily create, delete, merge and move branches around. It’s “cheap”.

Cheap Branching

Being able to create branches so easily allows you to change the way you work. Need to fix a bug? Create a branch. Working on a new feature? Create a branch. Want to experiment with some proof of concept? Create a branch. Because you can – and once you have you know that your changes are safely isolated from each other.

I can’t say it better than the man himself. If you haven’t seen this video of Linus Torvalds presenting Git at Google then I recommend it. You’ll need to see past his somewhat sarcastic demeanour in this talk – but I’m British, I’ve had a lot of practice.

Branches are the building blocks of pull requests (merge code from this source branch into this target branch). If you’re already in the habit of creating local branches then pushing those branches and creating pull requests is an easy extension to your process. I’ve said it before – pull requests have been the best improvement in our development process and was the most compelling reason for us to migrate to Git in the first place.

Manipulating Branches

Seeing that branches are just labels pointing at different commits in the history of the repository we can easily move them around.

Let’s walk through an example. Say I’ve got a feature branch in progress and I find and fix a bug. I’m in the middle of developing the new feature so just commit the bug fix alongside whatever else I’m working on. That becomes the latest commit in the graph.

* c123f06 (HEAD -> feature/some-great-new-feature) The bug fix
* 825e0ac Vehicles
* 45494f5 Bookings
* d80589c Ranger table and page
* 440e851 Animal table and page
* 3894d1a (origin/master, master) Correct typo in caption
* cd03362 Add missing caption for new field
* 94388de Populate new Customer field OnInsert
* c49b9c9 Add new field to Customer card

The problem is we need to get that bug fix out to a customer. The feature isn’t ready to be merged into master and we can’t wait. With hindsight I should have started a new branch to commit the bug fix to.

We can sort that out with cherry-pick and reset like this.

git branch bug/bug-fix master
git checkout bug/bug-fix
git cherry-pick c123f06

Create a new branch called “bug/bug-fix” pointing at the same commit that the master branch currently points to. Checkout that branch and cherry-pick the commit with hash c123f06. That isolates the bug fix into its own branch and I can create a pull request and merge it separately to the feature development. Great. Except, the bug fix is still in the feature branch. Here’s the graph:

* cef4f31 (HEAD -> bug/bug-fix) The bug fix
| * c123f06 (feature/some-great-new-feature) The bug fix
| * 825e0ac Vehicles
| * 45494f5 Bookings
| * d80589c Ranger table and page
| * 440e851 Animal table and page
|/
* 3894d1a (origin/master, master) Correct typo in caption
* cd03362 Add missing caption for new field
* 94388de Populate new Customer field OnInsert
* c49b9c9 Add new field to Customer card

We learnt last time that one solution to the problem would be to interactively rebase the feature branch on top of master and remove the bug fix commit from the rebase script.

pick 440e851 Animal table and page
pick d80589c Ranger table and page
pick 45494f5 Bookings
pick 825e0ac Vehicles
pick c123f06 The bug fix <-- YOU COULD REMOVE THIS LINE FROM THE SCRIPT

Reset

Alternatively you could use reset. Resetting a branch allows you to force it to point at a different commit. Remember, a branch is just pointing to a commit. It can point somewhere else if you want.

git checkout feature/some-great-new-feature
git reset 825e0ac

This will check out the feature branch and force it to point to commit 82530ac. You’ll notice that it leaves the changes between the commit it has come from and its new commit in the working folder. If you don’t want that you can add –hard to the command. That will tell Git to force the branch to point to the new commit and to hell with any consequences.

Resetting to a Forced Push

Another scenario you might want to reset is when a colleague has force pushed some changes to a branch. Perhaps they’ve rebased the branch and force pushed the changes to the server. Now you’ve got a local copy of the branch that no longer matches the remote copy. Here’s an example:

* f48d506 (origin/feature/some-great-new-feature) Animal table and page
* 9e96653 Vehicles
* d6dbbaf Bookings
* 473781f Ranger table and page
| * 825e0ac (HEAD -> feature/some-great-new-feature) Vehicles
| * 45494f5 Bookings
| * d80589c Ranger table and page
| * 440e851 Animal table and page
|/
* 3894d1a (origin/master, origin/HEAD, master) Correct typo in caption
* cd03362 Add missing caption for new field
* 94388de Populate new Customer field OnInsert
* c49b9c9 Add new field to Customer card

My copy of feature/some-great-new-feature is shown in the middle of the graph (commit 825e0ac). Meanwhile a colleague has reordered the commits and force pushed. The remote branch origin/feature/some-great-new-feature is now pointing at commit f48d506. I’m not going to be able to push any changes to the branch while my repository is in this state.

This kind of disruption is why you should be careful force pushing your changes to the server – but is sometimes necessary. If I’m confident that I’m not going to lose any work, all I want to do is force my local branch to point to the same commit as the server. We’ve just learnt that reset will do that.

If you want to preserve your changes locally – just in case you do have something locally that isn’t on the server – you can just create a new branch at the same point. When you’re sure you don’t need those commits you can delete that branch.

git checkout feature/some-great-new-feature
git branch backup feature/some-great-new-feature
git reset origin/feature/some-great-new-feature --hard

After running those commands the graph looks like this. My local feature branch now matches the server and I’ve got a new backup local branch which I can always check out if I need to.

* f48d506 (HEAD -> feature/some-great-new-feature, origin/feature/some-great-new-feature) Animal table and page
* 9e96653 Vehicles
* d6dbbaf Bookings
* 473781f Ranger table and page
| * 825e0ac (backup) Vehicles
| * 45494f5 Bookings
| * d80589c Ranger table and page
| * 440e851 Animal table and page
|/
* 3894d1a (origin/master, origin/HEAD, master) Correct typo in caption
* cd03362 Add missing caption for new field
* 94388de Populate new Customer field OnInsert
* c49b9c9 Add new field to Customer card

Next Time

That’s a few concepts about managing branches, amending history, rebasing and cherry-picking. Next time we’ll combine some of these concepts to discuss managing a Business Central app in all its different flavours, for different versions of BC and the branching strategy that we currently use and why.

Managing Business Central Development with Git: Rebasing

This is part two of a series about using Git to manage your Business Central development. This time – rebasing. It seems that rebasing can be something of a daunting subject. It needn’t be. Let’s start with identifying the base of a branch before worrying about rebasing.

Example Repo

Imagine this repository where I’ve created a new branch feature/new-field-on-sales-docs to do some development.

* 445e3e1 (HEAD -> feature/new-field-on-sales-docs) Add field to Order Confirmation
* fddf9fb Set DataClassification
* 176af2d Set field on customer validation
* 3cd4889 Add field to Sales Header
* 3894d1a (origin/master, master) Correct typo in caption
* cd03362 Add missing caption for new field
* 94388de Populate new Customer field OnInsert
* c49b9c9 Add new field to Customer card

We can consider that the base of the feature branch is where it diverges from the master branch. In this example commit 3894d1a is the base (“Correct typo in caption”). Simple. Now a more complex example:

* 412ce8f (HEAD -> bug/some-bug-fix) Fixing a bug in the bug fix
* 7df90bf Fixing a bug
| * d88a322 (feature/another-feature) And some more development
| * 0d16a39 More development
|/
| * 445e3e1 (feature/new-field-on-sales-docs) Add field to Order Confirmation
| * fddf9fb Set DataClassification
| * 176af2d Set field on customer validation
| * 3cd4889 Add field to Sales Header
|/
* 3894d1a (origin/master, master) Correct typo in caption
* cd03362 Add missing caption for new field
* 94388de Populate new Customer field OnInsert
* c49b9c9 Add new field to Customer card

I’ve got three branches on the go for a couple of new features and a bug fix. Follow the lines on the graph (created with git log –oneline –all –graph) and notice that they all diverge from master at the same commit as before. That is the base of each of the branches.

Now imagine that the bug fix is merged into the master branch – it was some urgent fix that we needed to push out to customers. I’ve merged the bug fix branch, deleted it and pushed the master branch to the server.

git checkout master
git merge bug/some-bug-fix
git push
git branch bug/some-bug-fix -d

The graph now looks like this:

* 412ce8f (HEAD -> master, origin/master) Fixing a bug in the bug fix
* 7df90bf Fixing a bug
| * d88a322 (feature/another-feature) And some more development
| * 0d16a39 More development
|/
| * 445e3e1 (feature/new-field-on-sales-docs) Add field to Order Confirmation
| * fddf9fb Set DataClassification
| * 176af2d Set field on customer validation
| * 3cd4889 Add field to Sales Header
|/
* 3894d1a Correct typo in caption
* cd03362 Add missing caption for new field
* 94388de Populate new Customer field OnInsert
* c49b9c9 Add new field to Customer card

Merge Commit vs Rebase Example

Now for an example of what rebasing is and why you might want to use it.

Despite what was happened to the master branch notice that the feature branches still diverge from the master branch at the same commit. They still have the same base. This is one reason you might want to consider rebasing. If I was to merge the feature/another-feature branch into master now I would create a merge commit. Like this:

* 44c19a0 (HEAD -> master) Merge branch 'feature/another-feature'
|\
| * d88a322 (feature/another-feature) And some more development
| * 0d16a39 More development
* | 412ce8f (origin/master) Fixing a bug in the bug fix
* | 7df90bf Fixing a bug
|/
| * 445e3e1 (feature/new-field-on-sales-docs) Add field to Order Confirmation
| * fddf9fb Set DataClassification
| * 176af2d Set field on customer validation
| * 3cd4889 Add field to Sales Header
|/
* 3894d1a Correct typo in caption
* cd03362 Add missing caption for new field
* 94388de Populate new Customer field OnInsert
* c49b9c9 Add new field to Customer card

The graph illustrates that the master branch and the feature branch diverged before being merged back together. An alternative solution would be to rebase the feature branch onto the master branch. What does that mean?

Git will identify the point at which the feature branch and the target branch (master in this case) diverged. This is commit 3894d1a as noted above. It will then rewind the changes that have been made since that point and replay them on top of the target branch.

git checkout feature/another-feature
git rebase master

First, rewinding head to replay your work on top of it…
Applying: More development
Applying: And some more development

And now the graph shows this

* ac25a75 (HEAD -> feature/another-feature) And some more development
* 8db81ff More development
* 412ce8f (origin/master, master) Fixing a bug in the bug fix
* 7df90bf Fixing a bug
| * 445e3e1 (feature/new-field-on-sales-docs) Add field to Order Confirmation
| * fddf9fb Set DataClassification
| * 176af2d Set field on customer validation
| * 3cd4889 Add field to Sales Header
|/
* 3894d1a Correct typo in caption
* cd03362 Add missing caption for new field
* 94388de Populate new Customer field OnInsert
* c49b9c9 Add new field to Customer card

The two commits that comprised the feature branch have been moved to sit on top of the master branch. It’s as if the development on the feature had been started after the bug fix changes had been made.

Notice that the commit ids are different – due to how Git works internally – but the effect is the same in both cases. The version of the code at the top of the log contains the changes for the both the bug fix and the new feature.

I won’t discuss the pros and cons of either approach. Rebasing keeps the history neater – all the commits line up in a straight line. Merge commits reflect what actually happened and the order in which changes were made. There are plenty of proponents of both approaches if you want to follow the subject up elsewhere.

Interactive Rebasing

In the previous post I was discussing the value of amending commits so that they tell the story of your development. With git amend we can edit the contents and/or commit message of the previous commit.

Remember that rebasing identifies a series of commits and replays them onto another commit. That’s useful for moving commits around. It is also very useful in helping to create the story of your development. Let me simplify the example again to show you what I mean.

* 445e3e1 (feature/new-field-on-sales-docs) Add field to Order Confirmation
* fddf9fb Set DataClassification
* 176af2d Set field on customer validation
* 3cd4889 Add field to Sales Header
* 3894d1a (HEAD -> master, origin/master) Correct typo in caption
* cd03362 Add missing caption for new field
* 94388de Populate new Customer field OnInsert
* c49b9c9 Add new field to Customer card

Look at commit fddf9fb Set DataClassification. I added a new field to the Sales Header table but forgot to set the DataClassification property so I’ve gone back and added it separately. That kinda sucks. Other developers don’t need to know that. It’s an unnecessary commit that will only make the history harder to read when we come back to it in the future.

But there’s a problem. I can’t amend the commit because I’ve committed another change since then. Enter interactive rebasing.

git checkout feature/new-field-on-sales-docs
git rebase master -i

This tells Git to identify the commits from the point at which the feature diverges from master, rewind them and then apply them on top of master again. In itself, the command will have no effect as we’re replaying the changes on top of the branch they are already on.

Adding the -i switch runs the command in interactive mode. You’ll see something like this in your text editor.

pick 3cd4889 Add field to Sales Header
pick 176af2d Set field on customer validation
pick fddf9fb Set DataClassification
pick 445e3e1 Add field to Order Confirmation

# Rebase 3894d1a..445e3e1 onto 445e3e1 (4 commands)
#
# Commands:
# p, pick <commit> = use commit
# r, reword <commit> = use commit, but edit the commit message
# e, edit <commit> = use commit, but stop for amending
# s, squash <commit> = use commit, but meld into previous commit
# f, fixup <commit> = like "squash", but discard this commit's log message
# x, exec <command> = run command (the rest of the line) using shell
# b, break = stop here (continue rebase later with 'git rebase --continue')
# d, drop <commit> = remove commit
# l, label <label> = label current HEAD with a name
# t, reset <label> = reset HEAD to a label
# m, merge [-C <commit> | -c <commit>] <label> [# <oneline>]
# .       create a merge commit using the original merge commit's
# .       message (or the oneline, if no original merge commit was
# .       specified). Use -c <commit> to reword the commit message.
#
# These lines can be re-ordered; they are executed from top to bottom.
#
# If you remove a line here THAT COMMIT WILL BE LOST.
#
# However, if you remove everything, the rebase will be aborted.
#
# Note that empty commits are commented out

You can think of this as a script that Git will follow to apply the changes on top of the target branch. Read it from top to bottom (unlike the Git log which is read bottom to top).

The script contains the four commits that exist in the feature branch but not in the master branch. By default each of those commits will be “picked” to play onto the target branch.

You can read the command help and see that you can manipulate this script. Reorder the lines to play the commits in a different order. Remove lines altogether to remove the commit. “Squash” one or more commits into a previous line. This is what we want.

I want to squash the “Add field to Sales Header” and “Set DataClassification” commits together. In future it will look as if I’ve made both changes at the same time. Great for hiding my ineptitude from my colleagues but also for making the history more readable. I’ll change the script to this:

pick 3cd4889 Add field to Sales Header
fixup fddf9fb Set DataClassification
pick 176af2d Set field on customer validation
pick 445e3e1 Add field to Order Confirmation

and close the text editor. Git does the rest and now my graph looks like this:

* 5025f76 (HEAD -> feature/new-field-on-sales-docs) Add field to Order Confirmation
* 367faab Set field on customer validation
* 91a9252 Add field to Sales Header
* 3894d1a (origin/master, master) Correct typo in caption
* cd03362 Add missing caption for new field
* 94388de Populate new Customer field OnInsert
* c49b9c9 Add new field to Customer card

Panic Button

Rebasing takes a little practice to get used to. You might want to include the -i switch every time you rebase to start with to check which commits you are moving around.

It isn’t uncommon to run into some merge commits when playing a commit in a rebase. You’ll get something like this alarming looking message

First, rewinding head to replay your work on top of it…
Applying: Add field to Sales Header
Applying: Set field on customer validation
Applying: Add field to Order Confirmation
Using index info to reconstruct a base tree…
Falling back to patching base and 3-way merge…
CONFLICT (add/add): Merge conflict in 173626564
Auto-merging 173626564
error: Failed to merge in the changes.
hint: Use 'git am --show-current-patch' to see the failed patch
Patch failed at 0003 Add field to Order Confirmation
Resolve all conflicts manually, mark them as resolved with
"git add/rm ", then run "git rebase --continue".
You can instead skip this commit: run "git rebase --skip".
To abort and get back to the state before "git rebase", run "git rebase --abort".

I’m not a fan of anything that has the word CONFLICT in caps…

VS Code does a nice job of presenting the content of the target branch the “current change” and the changes that are being played as part of the rebase the “incoming change”. Resolve the conflict i.e. edit the conflicted file to correctly merge the current and incoming changes and stage the file.

Once you’ve done that you can continue the rebase with git rebase –continue

If all hell breaks loose and you need to smash the emergency glass you can always run git rebase –abort, breath into a brown paper bag and the repo will be returned to the state it was in before the rebase.