“You cannot sign in due to a technical issue. Contact your system administrator.”
Business Central
Terrific. This is in a local Docker container, so I am the system administrator. Give me a second while I contact myself…
…nope, myself didn’t know what the problem was either.
It could be that the license has expired, maybe there is something wrong with the tenant, the service tier hasn’t been able to start, who knows? You should probably start by looking for errors in the event log of the container.
Maybe I’m missing a trick and there is an easier way to do this(?) but I look through the event log with PowerShell. You can run this command inside the container:
Get-EventLog Application -EntryType Error
That will return all the errors that have been logged in the Application log. Two problems though:
The list might be massive
You can’t see the full text of the messages
You can add the Newest parameter to specify the number of most recent messages that you want to return. Then you probably want to write the full text of the message so that you can actually read it.
Cool – although you still need to open a PowerShell prompt inside the container to run those commands. It would be nice if we didn’t need to do that. We can use docker exec to run a command against a local container from the outside.
Now we’re getting somewhere. But of course, you don’t want to be typing all that each time. I’ve declared a PowerShell function in my profile file (run code $profile in a PowerShell prompt to open the profile file in VS Code).
Declaring it in the profile file means that the function will always be available in a PowerShell prompt. The container name parameter must be supplied and optionally I can ask for more than just the latest one error. The string of asterisks is just to indicate where one log message ends and another begins.
Git hooks have been on my “to mess about with and learn a little some day” list for a while. It’s the old conundrum: I might use them if I knew what they could do, but I’m not going to learn about them until I’ve got a use for them. Chickens-and-eggs for developers.
The Problem
Until recently, that is. I wondered:
What is the best way to save a different launch configuration in VS Code for each branch in my repo?
Why would I want to do that? We have branches for versions of our apps compatible with BC14, 15 and 16. I’ve got separate Docker containers of each of those versions to develop and test against. I need to change the launch config when I want to test in another container. Not a great hardship admittedly, but it would be nice to automate somehow.
Source Control?
I could of course just source-control the launch.json file and commit the relevant changes to each branch. I don’t like that though. We ignore the .vscode folder in .gitignore. To my mind anything that happens in that folder is for the benefit of the local development environment. No one else cares what my launch config is – they’ll be pushing code to their own Docker containers or to SaaS sandboxes.
I suppose you could have some local commits that include the launch.json file that you don’t push to the server. Sounds horrible to manage though. Don’t do that.
So we want something that is related to source control – we want a launch config per branch – but doesn’t involve actually committing the config file. Enter hooks.
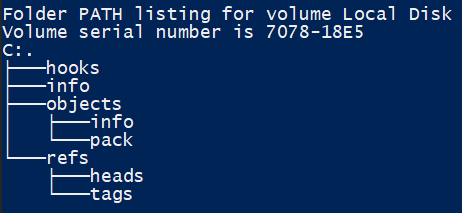
When a Git repo is initialised a .git folder is created which contains all the version history of the repo and Git’s guts. If you’re curious to learn more about how Git actually works have a browse through these folders. You might want to load up a presentation on the subject as well – like this: https://www.youtube.com/watch?v=ig5E8CcdM9g
You’ll notice that one of the folders is called hooks. This contains some sample hook files which you can take a look through. The .sample file type stops them from actually doing anything but you get a flavour of what’s possible and how you can use them.
Post-Checkout Example
For our example we’re going to want to use the post-checkout hook. This allows us to create a script that Git will execute after a checkout command. (Side note: I tend to use the integrated terminal in VS Code to execute Git commands, including checking out branches but this hook is also executed if you switch branches with the UI).
First, post-checkout isn’t one of the samples that is created when you init a new repo. You can copy the post-update.sample file instead and rename it to post-checkout (no file extension).
Writing the Hook
Okay…so what are we supposed to put in this file? Can we just start typing PowerShell? Erm…no, we can’t. The file looks distinctly Linuxy…*shudder* I’ve got nothing against Linux, I just have next to no idea what I’m doing.
The top line of the file indicates the language that you are going to script in. It’s possible to use Perl, Python, Ruby and a bunch of other stuff, including PowerShell. I won’t pretend to really know what I’m talking about but there is an useful thread on Stack Overflow on the topic.
#!/bin/sh
It is possible to write PowerShell directly into the hook file, but from what I’ve read it seems you need PowerShell Core to run it. I’ve settled for this:
Call powershell.exe to execute the .git\post-checkout.ps1 file and pass it the three parameters that have been received. Great. How do we know that there are three parameters? And what are they? You can read the documentation here: https://git-scm.com/docs/githooks#_post_checkout
The parameters are:
The previous HEAD (the commit that we’ve come from)
The new HEAD (the commit that we’ve just checked out)
A flag to indicate whether a branch was checked out (it has a value of 1 if it was)
Writing the Script
Now we’re getting somewhere.
The plan is:
Save the launch configuration as it stands for the branch that we are coming from
Find a saved launch configuration for the branch that we have moved to and overwrite launch.json
What Branch Have We Come From?
This is a subtler question than we might have expected. The parameter that Git passes is the hexadecimal hash of the commit that was previously checked out. Some jumble of numbers and letters that is integral to how Git works but probably meaningless to the developer. We need to convert that hash into a branch. Or branches – potentially more than one branch might be pointing at that commit.
git branch --points-at <commit hash>
The above command will give us zero or more branches that are pointing at a given commit. Note that the current branch is denoted with an asterisk which we’ll need to trim off the front of the name.
Which Branch Have We Moved To?
We can find the name of the new, current branch with:
git branch --show-current
Finally, branch names can contain characters that cannot be used in filenames. Specifically we use forward-slashes a lot in our branch names. I’ve got a Convert-BranchToFileName function to clean it up.
Putting all the jigsaw pieces together this is the content of my post-checkout.ps1 file (which is in the .git\hooks directory).
The result is something like this. When I checkout a new branch launch.json is copied to .vscode\launch\<branchname>.json and the saved json file matching the new branch name overwrites launch.json
A pretty trivial example you might argue – and you’d be right – but hopefully enough to demonstrate some of the possibilities. More useful examples might include:
Cleaning up the source directory between checkouts e.g. deleting .app files from previous builds or removing duplicate apps in the .alpackages folder
Checking Git configuration before committing e.g. is the email address that will be associated with the commit in an acceptable format e.g. does it make a particular regex pattern?
Enforcing some policy about compile errors or warnings before a new commit is made
I’ve written before about using Azure Cognitive Services to translate the captions in the .xlf file that is generated when you compile your Business Central app. For us, the motivation is to make our apps available in as many countries as possible in AppSource.
Since then Søren Alexandersen has announced that it will not be necessary to provide all of a country’s official languages to make your app available in that country.
You no longer have to provide local translations for AppSource apps for @MSDYN365BC. You decide languages to provide, as long as you mention them in the store!
We'll work on enabling you to hide your code while still enabling others to see and translate your xliffs. 🌏🌎🌍
If you going to provide translations you might be interested in how to improve upon a the approach of the last post.
The Problem
The problem of course is that we are relying on machine translation to translate very short phrases or single words. A single word can mean different things and be translated in many different ways into other languages depending on the context. Context that the machine translation doesn’t have. That’s what makes language and etymology simultaneously fascinating and infuriating.
The problem is compounded by abbreviations and acronyms. You and I know that “Prod. Order” is short for “Production Order”. But “Prod” is itself an English word that has nothing to do with manufacturing.
We know that FA is likely short for “fixed asset” but if you don’t know that the context is an ERP system it could mean a whole range of things. How is Azure supposed to translate it?
What we need is some domain-specific knowledge.
The Solution
When we think about it we know that we’ve already got thousands of translations of captions into the languages that we want – if only we can get them into a useful format. We’ve got Docker images of Business Central localisations. They contain the base app for the location complete with source/target pairs for each caption.
If you can get hold of the xlf file it’s a relatively simple job to search for a trans-unit that has a source node matching the caption that you want to translate and find the corresponding translated target node.
As an example, I’ve created a container called ch from the image mcr.microsoft.com/businesscentral/sandbox:ch – the Swiss localisation of Business Central.
This script will find the zip file containing the localised base application and extract it to the ‘C:\run\my\base’ folder. This will take a few minutes but when it is done you should see a Translations folder containing, in the case of Switzerland, four .xlf files.
The following script will load the fr-CH .xlf file into an Xml Document, search for a trans-unit node which has a child source node matching a given string and return the target i.e. the fr-CH translation.
$Language = 'fr'
$enUSCaption = 'Prod. Order Line No.'
[xml]$xlf = Get-Content (Get-ChildItem "C:\ProgramData\NavContainerHelper\Extensions\$ContainerName\my\base\Translations" -Filter "*$Language*").FullName

$NSMgr.AddNamespace('x',$xlf.DocumentElement.NamespaceURI)
$xlf.SelectSingleNode("/x:xliff/x:file/x:body/x:group/x:trans-unit[x:source='$enUSCaption']", $NSMgr).target
Which returns “N° ligne O.F.” – cool.
Some Obvious Points
I’m going to leave it there for this post, save for making a few obvious points.
This is hopelessly inefficient. Downloading the localised Docker image, creating the container, extracting the base app – all to get at the .xlf files. We’re going to want a smarter solution before using this approach in any volume and for more languages
Each .xlf file is 60+MB – that takes a while to load into memory – you’ll want to keep the variable in scope and reuse it for multiple searches rather than reloading the document
Not all of the US English captions you create in your app will exist in the base application – you’ll still want to send those off for translation.
Maybe we can start to address these points next time…
Sometimes you need to prompt the user to provide some value before you can complete your PowerShell script. You’ve got a few different options depending on what you’re asking the user to select from.
Parameters
Setting a parameter as mandatory without providing a value will prompt the user to enter one, like this:
function Invoke-AmazingPowerShellFunction {
  Param(
    [Parameter(Mandatory=$true)]
    [string]$ImportantParameter
  )
}
Setting the parameter type ([string] in this case) isn’t essential but will help validate that the input is at least of the right type. The trouble with users is that they can, and will, enter any old nonsense as the parameter value and you need to be able to handle it.
The ValidateSet attribute helps out where you have a fixed set of values that are the only valid ones.
If you don’t know at design-time what the valid options are going to be then you need a different approach.
Out-GridView
Out-GridView has an OutputMode parameter which allows you to specify whether the user should be able to select a value and if so, a single value or multiple values. It also allows you to set a title for the window and provides a filter to help the user find the right value. Good for when there is a lot to choose from. We use it, for example, to choose a project from Azure DevOps.
In passing I’ve also found Out-GridView useful when working with complex types e.g. from a web service response and I just want to be able to browse the values in the object. You can pipe anything to it and it will render it into a nice grid.
Write-Host ("You selected {0}" -f ('1','2','3' | Out-GridView -OutputMode Single -Title 'Please select a value'))
Roll Your Own
Recently I wanted to prompt the user to make a selection between some options in the terminal. In my experience the Out-GridView window doesn’t always open in the foreground and if you’re using multiple monitors won’t necessary open near the window you’re executing the script in. I thought I’d try keeping the focus in the terminal window instead.
I couldn’t find anything already in PowerShell to print a list of options and prompt the user to choose one, so I wrote the below. I’d be interested to know if I’ve missed something obvious already built in though.
It takes a collection of strings that represent the options to choose between and some text that you want to prompt the user with. The options are printed with numbers next to them, waits for some input from the user with Read-Host and matches it to their selection.
0 is hard-coded as a cancel option and will return an empty string, otherwise the string of the user’s selection is returned.
I’m a bit of a minimalist when it comes to tooling, so I’m always happy to ditch a tool because its functionality can be provided by something else I’m already using.
In a previous post I described how we use our Build Helper AL app to prep a test suite with the test codeunits and methods that you want to run. Either as part of a CI/CD pipeline or to run from VS Code.
The new extensionId parameter for the Run-TestsInBCContainer function removes the need to prepare the test suite before running the tests. Happily, that means we can dispense with downloading, publishing, installing, synchronising and calling the Build Helper app.
The next version of our own PowerShell module will read the app id from app.json and use the extensionId parameter to run the tests. Shout out to Freddy for making it easier than ever to run the tests from the shell 👍