Building Microsoft Dynamics 365 Business Central Apps on Azure DevOps Hosted Agents

This is a quick follow up to this post. If you want an intro to building AL apps for Business Central you might want to check that out first.

In order to build your apps you need a build agent running somewhere which will listen for new jobs and run the scripts, create the Docker containers, run the tests or do whatever else you define in the build file.

You can install an agent on your own server somewhere and authenticate with a personal access token. You’re in charge of the hardware, install agents and scale the performance as you see fit.

Hosting

The alternative is to choose one of the hosted agents that Microsoft provide. The obvious attraction is that you don’t need to maintain any hardware. You just specify the type of machine (Ubuntu, Mac, Windows) that you want the job to run on and pay-as-you-go. Or possibly, don’t pay at all.

With the free tier of Azure DevOps you get:

  • One build job running at a time (other jobs will be queued until that has finished)
  • 1,800 minutes of build time per month

That’s cool. You can keep tabs on your usage and purchase more parallel jobs from here: https://dev.azure.com/<your organisation>/settings/buildqueue?_a=concurrentJobs

If you hit the limits of the free tier you can check out the cost of more jobs here: https://azure.microsoft.com/en-us/pricing/details/devops/azure-devops-services/. At the time of writing 40 USD gets you a second concurrent job and lifts the build minutes per month restriction to unlimited.

Self-Hosting

So…why would you not run on hosted agents? Cost is a consideration. Additional parallel jobs on self-hosted agents are only 15 USD per month. But, what’s 25 dollars per month between friends? That’s assuming you can’t live within the limits of the free tier. If you can then using hosted agents is free.

The main consideration as far as I can see is performance. If you are going to create a Docker container as part of your build (and if you aren’t then I’m not sure what you’re doing) then self-hosted agents are always going to have an advantage. You can have the right Docker image ready downloaded before the build begins but a hosted agent will always needs to download it first.

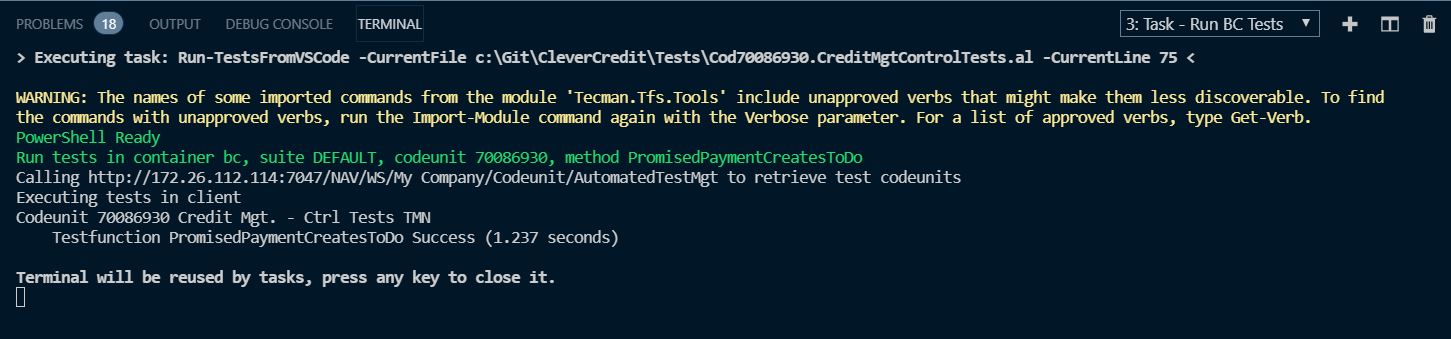
Our builds, running on a self-hosted agent, typically take between 8 and 15 minutes to complete, depending on how many tests are included in the build. Using the “Hosted Windows 2019 with VS2019” agent pool a test build (which just creates the downloads the Docker image and creates the container) takes around 18 minutes – pulling the latest production sandbox image.

NavContainerHelper is version 0.6.2.3
Host is Microsoft Windows Server 2019 Datacenter - ltsc2019
Docker Client Version is 18.09.6
Docker Server Version is 18.09.6
Pulling image mcr.microsoft.com/businesscentral/sandbox:latest-ltsc2019
latest-ltsc2019: Pulling from businesscentral/sandbox

Add in some time to actually build and publish the app, run the tests and upload the results and we’re probably looking closer to 25 minutes for the whole thing.

I’ll leave it up to you to decide whether you care enough about that performance difference to host build agents yourself. Then again, 1800 / 25 = 72 builds per month before you need to consider paying for more. Maybe that’s all you need? Especially if you’re just getting started with Azure DevOps, builds, YAML and all that jazz…

Working with Azure DevOps Pipelines in YAML

Overview

This post is an update to a post I made about YAML pipelines here. We’ll also take the opportunity to discuss why you might want to define a pipeline with YAML.

Wait…What?

What the heck are we talking about? (skip this bit if you do know what we’re talking about) A pipeline defines a series of tasks, running on defined environments that are performed with your code. In Azure DevOps they come in two flavours:

  • Build – for us that means, taking our AL source code, splitting it into two (test app and production app), compiling them, signing them, publishing and installing into a new container and running the tests and saving the .app files as artefacts of the build
  • Release – taking the built software and deploying it into one or more test and/or production environments – we don’t currently use release pipelines

Pipeline as Code, Why?

Defining the steps involved in your pipeline in a YAML file is sometimes called “pipeline as code” because the YAML file is checked-in to your repository alongside your source code.

The benefit is that your pipeline is version controlled. You can view its history, compare versions, blame/annotate etc. You could also have different versions of your pipeline in different branches and include it in a pull request.

The downside is of having yet another markup language to learn. What are you supposed to put in this file anyway?

Defining the Pipeline

Let’s consider two ways of creating and maintaining your pipeline file. I’m sticking to Visual Studio Code and Azure Repos/Pipelines in Azure DevOps as that’s what I’m familiar with. Loads of other options are available, loads of them supported in Azure DevOps.

In Azure DevOps

The features in Azure DevOps and the UI change frequently as they add new stuff. Microsoft announced loads of changes, including a new YAML editing experience (below) and YAML release pipelines, at Build 2019. You can browse through and watch sessions here: https://www.microsoft.com/en-us/build search for DevOps to jump to the sessions related to this post.

I’ve got a Hello World app with the AL code hosted in Azure Repos. Let’s walk through creating the pipeline file in the UI. Select Builds from the Pipelines menu and hit the “New pipeline” button.

Choose where you want this pipeline to fetch the source code from. In my case it’s in an Azure Repos Git repository.

And I’ve only got one in this project, so I’ll select that.

I don’t have an existing pipeline file, so I’ll create a starter pipeline.

And there it is.

Great…but what does all that mean?

Firstly, this is a pretty neat editor. It works a lot like Visual Studio Code. Maybe it even is Visual Studio Code behind the web page, for all I know. You can hover over different parts of the file and get tooltips about what they do. You also get intellisense when you hit Ctrl+Space giving you some info about the valid options for this part of the file.

Briefly, this pipeline will:

  • Trigger a build when changes are pushed to the master branch
  • Run the build on a hosted ubuntu agent (this is the “we love Linux, we love open-source” Microsoft after all)
  • Run a script to echo “Hello, World!”
  • Run another script to echo some more text

Let’s save and run the pipeline. I’ll commit straight to the master branch for now.

I’m bounced over to see the build that has been scheduled and can watch it run. This is the result:

You can click into each of the steps to see the logs for that step.

In Visual Studio Code

Notice that the file created above was automatically named .azure-pipelines.yml. That is the magic name that Azure DevOps will automatically recognise as defining a pipeline. That means if you create a file with that name and push it to Azure Repos it will automatically create a pipeline using that file as the definition for you.

When I flick back to Visual Studio Code I’ve got a commit waiting to be fetched into my local repo which was created when I saved the pipeline file. Now that I’ve got .azure-pipelines.yml locally I can edit it and source control it just like anything else.

To get the same editing experience as you had online you’re going to want to grab the Azure Pipelines extension for Visual Studio Code. That will recognise that the file is a pipeline definition and give you all the intellisense and more-info goodness you had in the browser.

Further Reading

For more information about what you can do with the yml file check out: https://aka.ms/yaml otherwise I’ll follow up with something more Business Central specific in another post.

Testing Your Microsoft Dynamics 365 Business Central Tests

Seeing as I’m on a bit of a run of posts about testing, let’s look at it from a slightly different angle.

Testing the Test

If we’re going to rely on automated tests to verify that our code (still) works then we need to have confidence that the tests themselves actually work.

Writing the Test First

This is why it is helpful to write and run the tests first. When you start developing a new feature or working on a bug fix you have identified some desired behaviour that the system doesn’t yet exhibit. Given this and this, when something or other then this is the behaviour I’m expecting.

Writing a test for that behaviour and seeing it fail confirms that the desired behaviour is missing. That gives you some confidence that you’re on the right lines – the system should do this, but doesn’t – yet.

When you write the bug fix or new feature and see the test pass it gives you much more confidence that your code actually works. You demonstrated beforehand that the desired behaviour was missing and that now it is there. Have a gold star.

Writing the Test Afterwards

You could write the test afterwards and we’ve done a lot of that as we’ve built up tests for our older code that didn’t have any. Whenever I write tests after the fact I do miss the initial stage of having an expected failing test though.

Not completing the given or the when can be a useful way to test the test. Asserting the expected results when you haven’t done all the required steps should normally cause the test to fail.

For example:

//[GIVEN] an item with my bespoke field populated
LibraryInventory.CreateItem(Item);
SomeBespokeValue := ...;

//leave these lines commented out initially to see the test fail
//Item.Validate("Bespoke Field",SomeBespokeValue);
//Item.Modify(true);

//[WHEN] the item is validated on a sales line
LibrarySales.CreateSalesDocumentWithItem(...)

//[THEN] some bespoke field on the sales line should be set
Assert.AreEqual(SalesLine."Bespoke Field",SomeBespokeValue,...)

Seeing the test fail with those lines commented out and then seeing it pass when you uncomment them will give you more confidence that the test and the behaviour that it is testing work as required. If you are testing code that you think already works and the test always passes it is hard to be sure why the test is passing. Hopefully because the code works – but possibly because the test itself is broken and will always pass, even if the code doesn’t work.

Confidence

The point is to try and get some confidence in your test results. Are you happy to ship the software when all your tests pass? If not, why not? Because you don’t have enough tests? Because you don’t trust that a passing test means working software?

Having a bunch of tests whose results you don’t trust is probably worse than having no tests at all.

Business Central

This is all pretty generic and if you’re interested in the principles you can search for Test-Driven Development (TDD) or Behaviour-Driven Development (BDD) and read what people far more qualified than me have to say about it.

Let’s talk about Business Central specifically for a minute. One of the best things about automated testing compared to manual testing is that everything is rolled back at the end to return the database to the same state it was in at the start. However, that can make life a little difficult when you are trying to inspect the data mid-test and see what is happened.

There are various ways you might want to extract the data at a given moment: write to a file, throw an error with a bunch of values you are interested in, read uncommitted data in SQL. We’ll just talk about two approaches:

Debugger

You can debug test code just like any other code. Set a breakpoint in your test, attach the debugger and run the test from the Test Tool page. Step through, add watches and evaluate debug expressions. The debugger in VS Code is getting better all the time, exposing more details about the variables you are interested in and SQL statements that have been executed.

Perfect for diving into the details and stepping through line by line, but not always the easiest to get an overview of what is happening.

Another Client Session

Another option is to open another client session while you are debugging. Set a breakpoint, attach the debugger and start running a test from the Test Tool page.

Executing Tests Dialog.JPG

Debugging the test will block the session that you started it from – you’ll get the “working on it” dialog – but you can open a different session in another tab or in another browser.

The only snag with this is that some of the records that you want to read might be locked and you’ll get an error trying to open the corresponding page.

Record Locked by Another User.JPG

“The operation could not complete because a record was locked by another user.” Bummer.

Turns out there is another way to read the data in that session.

Avoid Locks With Page=<pageid>

You can add parameters to the web client URL to navigate to specific tables, reports or pages. In my example I can’t open the Items list from the menu because the record is locked by another user.

If I go to the Item List page with http://<base web client URL>?page=32 then the page loads with my test data. I can open the item card, navigate to other pages and run the Page Inspector (Ctrl+Alt+F1) to view all the fields in the table, filters, extension details etc.

As I step through the code in the VS Code debugger I can refresh the pages in this session and see the updates to the record. Beautiful.

Item Card with Test Data.JPG

Further Reading

If you’re interested in getting stuck into testing in Business Central grab yourself a copy of Automated Testing in Microsoft Dynamics 365 Business Central.

Automated Testing in Microsoft Dynamics 365 Business Central

It was my pleasure to make a small contribution to this book as a technical reviewer and writing the foreword.

https://www.packtpub.com/business/automated-testing-microsoft-dynamics-365-business-central

Part 3: Testing Microsoft Dynamics 365 Business Central from VS Code

Another instalment of my musings on running automated tests for Microsoft Dynamics 365 Business Central from Visual Studio Code.

Objective

What are we up to this time? As a brief reminder, I’m trying to make it as easy as possible to run automated tests from Visual Studio Code. I figure the faster and simpler it is to publish your code changes and run the tests the more inclined you are going to be to do it. The more you test the better your code will be.

If you’re trying to follow a discipline like Test-Drive Development you need tight feedback loops writing code and running tests. Being able to do that from the IDE and without having to switch back and forth to the browser is so much nicer.

To that end, if you are working on a particular test codeunit maybe it makes sense to only run the tests in that codeunit – in the interests of getting the feedback from those tests as quickly as possible. Or maybe just running the single test method that you’re working on. Once, you’re happy with those changes you can run the whole test suite again to make sure you haven’t broken anything else in the meantime.

Fortunately, it turns out we’ve already got the pieces we need to assemble this jigsaw.

NavContainerHelper

Being the considerate sort of chap that he is, Freddy has already included testCodeunit and testFunction parameters for the Run-TestsInNavContainer function. We just need to figure out how to plug the right values into those parameters.

Some More About VS Code Tasks

In this post I showed how you can define a task in VS Code to run some PowerShell. It turns out you can do more in tasks.json than I realised.

This is what my file looks like now:

{
    // See https://go.microsoft.com/fwlink/?LinkId=733558
    // for the documentation about the tasks.json format
    "version": "2.0.0",
    "tasks": [
        {
            "label": "Run BC Tests",
            "type": "shell",
            "command": "Run-TestsFromVSCode -CurrentFile ${file} -CurrentLine ${lineNumber}",
            "group": {
                "kind": "test",
                "isDefault": true
            },
            "presentation": {
                "echo": true,
                "reveal": "always",
                "focus": false,
                "panel": "shared",
                "showReuseMessage": true,
                "clear": true
            }
        }
    ]
}

The presentation object controls the behaviour of the terminal that the task is run in. I’m just using it to clear the terminal each time.

The really interesting part is ${file} and ${lineNumber}. These placeholders are replaced with the current file and current line number in the editor when the task is executed. Ooooo. You can probably see where I’m going with this. That’s all the information we need to run the current test codeunit and method.

I’ve created a new Run-TestsFromVSCode function in our PowerShell module to handle this. Notice I’m calling that function from the task now instead of our Run-BCTests function directly.

Run-TestsFromVSCode

Assuming a file path has been passed to the function it determines whether the current file is a test codeunit i.e. does it contain the text “Subtype = Test”? If so, use Regex to find the id of the codeunit from the first line.

Now attempt to find the previous declaration of a test function from the current line no (search backwards for a line that contains “[Test]” then forwards from that line to a procedure declaration).

Then call Run-BCTests with all the information that you’ve been able to find. Passing an asterisk rather than blank for the codeunit and/or method acts as a wildcard and will run everything, instead of nothing.

function Run-TestsFromVSCode {
    param(
        # The current file the tests are invoked from
        [Parameter(Mandatory=$false)]
        [string]
        $CurrentFile,
        # The current line no. in the current file
        [Parameter(Mandatory=$false)]
        [string]
        $CurrentLine
    )

    if ($null -eq $CurrentFile) {
        Run-BCTests
    }
    else {
        # determine if the current file is a test codeunit
        if ((Get-Content $CurrentFile -Raw).Contains('Subtype = Test')) {
            $TestCodeunit = [Regex]::Match((Get-Content $CurrentFile).Item(0),' \d+ ').Value.Trim()
            if ($null -ne $CurrentLine) {
                $Method = Get-TestFromLine -Path $CurrentFile -LineNumber $CurrentLine
                if ($null -ne $Method) {
                    Run-BCTests -TestCodeunit $TestCodeunit -TestMethod $Method
                }
                else {
                    Run-BCTests -TestCodeunit $TestCodeunit -TestMethod '*'
                }
            }
        }
        else {
            Run-BCTests
        }
    }
}

function Get-TestFromLine {
    param (
        # file path to search
        [Parameter(Mandatory=$true)]
        [string]
        $Path,
        # line number to start at
        [Parameter(Mandatory=$true)]
        [int]
        $LineNumber
    )
    
    $Lines = Get-Content $Path
    for ($i = ($LineNumber - 1); $i -ge 0; $i--) {
        if ($Lines.Item($i).Contains('[Test]')) {
            # search forwards for the procedure declaration (it might not be the following line)
            for ($j = $i; $j -le $Lines.Count; $j++)
            {
                if ($Lines.Item($j).Contains('procedure')) {
                    $ProcDeclaration = $Lines.Item($j)
                    $ProcDeclaration = $ProcDeclaration.Substring($ProcDeclaration.IndexOf('procedure') + 10)
                    $ProcDeclaration = $ProcDeclaration.Substring(0,$ProcDeclaration.IndexOf('('))
                    return $ProcDeclaration
                }
            }
        }
    }
}

Export-ModuleMember -Function Run-TestsFromVSCode

The terminal output from the task now looks like this:

Run-TestsFromVSCode.JPG

Notice the current file and line number passed to the task and the current codeunit id and method passed to navcontainerhelper to run.

To run all the methods in the current codeunit move the cursor above the line of the first test method declaration.

To run all methods in all codeunits move the cursor outside a test codeunit – although you must have some file open otherwise VS Code will fail to resolve the ${file} and ${lineNumber} placeholders.

You could of course define more tasks to run these options if you prefer.

Conclusion

All of this enables this kind of workflow, if that’s what you’re into:

  1. Create a new (failing) test and publish app
  2. Run (just) that test and check that it fails
  3. Write production code and publish app
  4. Run (just) that test and check that it now passes
  5. Run all the tests in that codeunit / your whole suite
  6. Commit your changes

Wish List

I’m pleased with how far I’ve been able to get, but there’s still some significant items not crossed off the wish list.

Debugging Tests

For now you still have to launch the browser (at least we can debug without publishing these days) and start the test from that session. I believe the old “debug next” functionality we used to have in the Windows client debugger is on the roadmap somewhere. That would do the trick.

Performance

Leaves a lot to be desired. Running a single method in a single test codeunit takes anywhere between 6 and 10 seconds. Obviously, some of that time is the test itself and is in our control, but most of that is preparing the suite and creating and connecting the client.

I know Microsoft are overhauling how tests are executed by the platform, so maybe some performance gains are also in the pipeline.

Part 2: Testing Microsoft Dynamics 365 Business Central from VS Code

Last time out we went through running automated tests from the PowerShell terminal integrated into VS Code. We saw that you could define a task in the tasks.json file to run the tests and assign a keyboard shortcut for that task.

Great. But. In order to run tests they first need to have been added to a test suite. You could add some code to an install codeunit in your app to do that for you (see here). That approach is nice and clean, but leaves a couple of things to be desired:

  • What if you want to specify the test suite, or codeunit(s) that you want to use?
  • How can you clear the test suite?

You can’t. Which is why we have a “Build Helper” app to add and remove test codeunits from test suites. It contains a single codeunit which is exposed as a web service which we call from PowerShell.

This is the codeunit and the PowerShell it is called with (see here if you can’t see the embedded gist).


codeunit 90100 "Automated Test Mgt. BHTMN"
{
var
CALTestManagement: Codeunit "CAL Test Management";
ObjectNotCompiledErr: Label 'Object not compiled.';
procedure GetTests(TestSuiteName: Code[10]; StartID: Integer; EndID: Integer)
var
CALTestSuite: Record "CAL Test Suite";
CALTestLine: Record "CAL Test Line";
AllObjWithCaption: Record AllObjWithCaption;
begin
GlobalLanguage(1033);
if TestSuiteName = '' then
TestSuiteName := 'DEFAULT';
if not CALTestSuite.Get(TestSuiteName) then begin
CALTestSuite.Init();
CALTestSuite.Name := TestSuiteName;
CALTestSuite.Description := 'Automated Testing';
CALTestSuite.Validate(Export, false);
CALTestSuite.Insert(true);
end;
CALTestSuite.SetRecFilter();
if StartID = 0 then
StartID := 9000000;
//add test codeunits
AllObjWithCaption.SetRange("Object Type", AllObjWithCaption."Object Type"::Codeunit);
AllObjWithCaption.SetRange("Object Subtype", 'Test');
if EndID > 0 then
AllObjWithCaption.SetRange("Object ID",StartID,EndID)
else
AllObjWithCaption.SetFilter("Object ID",'%1..',StartID);
AddTestCodeunits(CALTestSuite, AllObjWithCaption);
//add test methods
CALTestLine.SetRange("Test Suite", TestSuiteName);
CALTestLine.SetRange("Line Type", CALTestLine."Line Type"::Codeunit);
if CALTestLine.FindSet() then
repeat
CALTestManagement.RunSuite(CALTestLine, false);
until CALTestLine.Next() = 0;
CALTestLine.SetRange("Line Type");
if CALTestLine.FindFirst() then;
end;
procedure ClearTestSuite(TestSuite: Code[10])
var
CALTestLine: Record "CAL Test Line";
begin
CALTestLine.SetRange("Test Suite",TestSuite);
CALTestLine.DeleteAll(true);
end;
local procedure AddTestCodeunits(CALTestSuite: Record "CAL Test Suite"; VAR AllObjWithCaption: Record AllObjWithCaption)
var
TestLineNo: Integer;
begin
if AllObjWithCaption.FIND('-') then begin
TestLineNo := GetLastTestLineNo(CALTestSuite.Name);
repeat
TestLineNo := TestLineNo + 10000;
AddTestLine(CALTestSuite.Name, AllObjWithCaption."Object ID", TestLineNo);
until AllObjWithCaption.Next() = 0;
end;
end;
local procedure GetLastTestLineNo(TestSuiteName: Code[10]) LineNo: Integer
var
CALTestLine: Record "CAL Test Line";
begin
CALTestLine.SetRange("Test Suite", TestSuiteName);
if CALTestLine.FindLast() then
LineNo := CALTestLine."Line No.";
end;
local procedure AddTestLine(TestSuiteName: Code[10]; TestCodeunitId: Integer; LineNo: Integer)
var
CALTestLine: Record "CAL Test Line";
AllObj: Record AllObj;
Object: Record Object;
CodeunitIsValid: Boolean;
begin
with CALTestLine DO begin
if TestLineExists(TestSuiteName, TestCodeunitId) then
exit;
Init();
Validate("Test Suite", TestSuiteName);
Validate("Line No.", LineNo);
Validate("Line Type", "Line Type"::Codeunit);
Validate("Test Codeunit", TestCodeunitId);
Validate(Run, true);
Insert(true);
AllObj.SetRange("Object Type", AllObj."Object Type"::Codeunit);
AllObj.SetRange("Object ID", TestCodeunitId);
AllObj.FindFirst();
if Format(AllObj."App Package ID") <> '' then
CodeunitIsValid := true;
if not CodeunitIsValid then begin
Object.SetRange(Type, Object.Type::Codeunit);
Object.SetRange(ID, TestCodeunitId);
CodeunitIsValid := Object.FindFirst();
end;
if CodeunitIsValid then begin
CALTestManagement.SETPUBLISHMODE();
SetRecFilter();
Codeunit.Run(Codeunit::"CAL Test Runner", CALTestLine);
end else begin
Validate(Result, Result::Failure);
Validate("First Error", ObjectNotCompiledErr);
Modify(true);
end;
end;
end;
local procedure TestLineExists(TestSuiteName: Code[10]; TestCodeunitId: Integer): Boolean
var
CALTestLine: Record "CAL Test Line";
begin
CALTestLine.SetRange("Test Suite", TestSuiteName);
CALTestLine.SetRange("Test Codeunit", TestCodeunitId);
exit(not CALTestLine.IsEmpty());
end;
}

view raw

BuildHelper.al

hosted with ❤ by GitHub


function Get-TestCodeunitsInContainer {
param (
# Container to load test codeunits into
[Parameter(Mandatory=$false)]
[string]
$ContainerName = (Get-ContainerFromLaunchJson),
# Credentials to use to connect to web service
[Parameter(Mandatory=$false)]
[PSCredential]
$Credential = (New-CredentialFromEnvironmentJson),
# Name of the test suite to add the test codeunits to
[Parameter(Mandatory=$false)]
[string]
$TestSuite = '',
# Start of the range of objects to add
[Parameter(Mandatory=$false)]
[int]
$StartId = ((Get-AppKeyValue -SourcePath (Get-Location) -KeyName 'idrange').from),
# End of the range of objects to add
[Parameter(Mandatory=$false)]
[int]
$EndId = ((Get-AppKeyValue -SourcePath (Get-Location) -KeyName 'idrange').to)
)
Install-BuildHelper -ContainerName $ContainerName
$CompanyName = Get-ContainerCompanyToTest -ContainerName $ContainerName
$Url = "http://{0}:7047/NAV/WS/{1}/Codeunit/AutomatedTestMgt" -f (Get-NavContainerIpAddress -containerName $ContainerName), $CompanyName
Write-Host "Calling $Url to retrieve test codeunits"
$AutomatedTestMgt = New-WebServiceProxy -Uri $Url -Credential $Credential
$AutomatedTestMgt.GetTests($TestSuite,$StartId,$EndId)
}

I think the AL is pretty self-explanatory. The PowerShell is a little more interesting.

Install-BuildHelper acquires the latest version of the app from the build artefacts (as described here). It checks whether it is already installed first by attempting to reach the address of the WSDL (http://<server + port>/NAV/WS/Codeunit/AutomatedTestingMgt). I’ve found that to be a little faster than Get-NavContainerAppInfo.

It uses New-WebServiceProxy (as described here) to call the web service methods.

Get-ContainerCompanyToTest fetches the name of (usually) the first company in the container to call the service against. It does this calling the SystemService web service rather than Get-CompanyInNavContainer – again, as it is slightly faster.

By “faster” I mean a couple of seconds. That’s trivial compared to the execution time of the test suite but given that I’m trying to move to a tighter {develop test -> run tests -> develop app -> run tests} loop I’ll take the saving.

I’m a fan of default values so it:

  • Takes the container from launch.json
  • Creates a credential object using the credentials we store in our environment.json file
  • Takes the start and end of the range of codeunits to add from the idrange set in app.json

There is a Clear-TestSuite function as well. I haven’t bothered pasting it here because it’s just a simplified version of Get-TestCodeunitsInContainer.