Obligatory Preamble
I wasn’t really intending to write this post. If you want training materials for learning the basic concepts of Git then there is tonnes of great free content around on blogs and YouTube channels. I was going to share some thoughts about our branching strategy but thought I’d write a little about manipulating branches first.
Amble
When I was new to Git and trying to establish whether it was worth the time and effort migrating from TFVC I heard a lot about branches. “Migrate to Git” they said. “Branching is so cheap”. What on earth does that mean?
In TVFC, creating a branch of your source code involves creating an entire copy of the working folder, with all of its contents. Conceptually this is nice and easy. If you want to work in another branch then you work in another folder. Changes in different branches are isolated from each other in separate folders.
In performance terms though, not so great i.e. “expensive”. Especially when we were working with 5K+ CAL object text files. Creating a copy of all those files and downloading from the server took some time. Visual Studio would complain that I had more than 100K files under source control – which should be OK…but do you really need all of these it would complain?
Git’s approach to branches is very different. You can think of them as just labels that point at a given commit in the graph. Creating a new branch is just a case of creating a new label, a tiny new text file in the .git directory.
* 825e0ac (HEAD -> feature/some-great-new-feature) Vehicles
* 45494f5 Bookings
* d80589c Ranger table and page
* 440e851 Animal table and page
| * 1225ee5 (bug/some-bug-fix) Fix sales order posting bug
|/
| * 5025f76 (feature/new-field-on-sales-docs) Add field to Order Confirmation
| * 367faab Set field on customer validation
| * 91a9252 Add field to Sales Header
|/
* 3894d1a (origin/master, master) Correct typo in caption
* cd03362 Add missing caption for new field
* 94388de Populate new Customer field OnInsert
* c49b9c9 Add new field to Customer card
There are 12 commits in this repository. Each commit is a snapshot of the status of the entire source code – the accumulation of all the changes up to that point. The four (local) branches are just pointers to different places in the graph. HEAD just indicates the point at which a new commit will be added i.e. this commit will become the parent of the next commit you make.
Conceptually a little harder to get your head around – but so much more elegant and powerful. You have a single working folder, the contents of which reflect the branch that is currently checked-out. You can quickly and easily create, delete, merge and move branches around. It’s “cheap”.
Cheap Branching
Being able to create branches so easily allows you to change the way you work. Need to fix a bug? Create a branch. Working on a new feature? Create a branch. Want to experiment with some proof of concept? Create a branch. Because you can – and once you have you know that your changes are safely isolated from each other.
I can’t say it better than the man himself. If you haven’t seen this video of Linus Torvalds presenting Git at Google then I recommend it. You’ll need to see past his somewhat sarcastic demeanour in this talk – but I’m British, I’ve had a lot of practice.
Branches are the building blocks of pull requests (merge code from this source branch into this target branch). If you’re already in the habit of creating local branches then pushing those branches and creating pull requests is an easy extension to your process. I’ve said it before – pull requests have been the best improvement in our development process and was the most compelling reason for us to migrate to Git in the first place.
Manipulating Branches
Seeing that branches are just labels pointing at different commits in the history of the repository we can easily move them around.
Let’s walk through an example. Say I’ve got a feature branch in progress and I find and fix a bug. I’m in the middle of developing the new feature so just commit the bug fix alongside whatever else I’m working on. That becomes the latest commit in the graph.
* c123f06 (HEAD -> feature/some-great-new-feature) The bug fix
* 825e0ac Vehicles
* 45494f5 Bookings
* d80589c Ranger table and page
* 440e851 Animal table and page
* 3894d1a (origin/master, master) Correct typo in caption
* cd03362 Add missing caption for new field
* 94388de Populate new Customer field OnInsert
* c49b9c9 Add new field to Customer card
The problem is we need to get that bug fix out to a customer. The feature isn’t ready to be merged into master and we can’t wait. With hindsight I should have started a new branch to commit the bug fix to.
We can sort that out with cherry-pick and reset like this.
git branch bug/bug-fix master
git checkout bug/bug-fix
git cherry-pick c123f06
Create a new branch called “bug/bug-fix” pointing at the same commit that the master branch currently points to. Checkout that branch and cherry-pick the commit with hash c123f06. That isolates the bug fix into its own branch and I can create a pull request and merge it separately to the feature development. Great. Except, the bug fix is still in the feature branch. Here’s the graph:
* cef4f31 (HEAD -> bug/bug-fix) The bug fix
| * c123f06 (feature/some-great-new-feature) The bug fix
| * 825e0ac Vehicles
| * 45494f5 Bookings
| * d80589c Ranger table and page
| * 440e851 Animal table and page
|/
* 3894d1a (origin/master, master) Correct typo in caption
* cd03362 Add missing caption for new field
* 94388de Populate new Customer field OnInsert
* c49b9c9 Add new field to Customer card
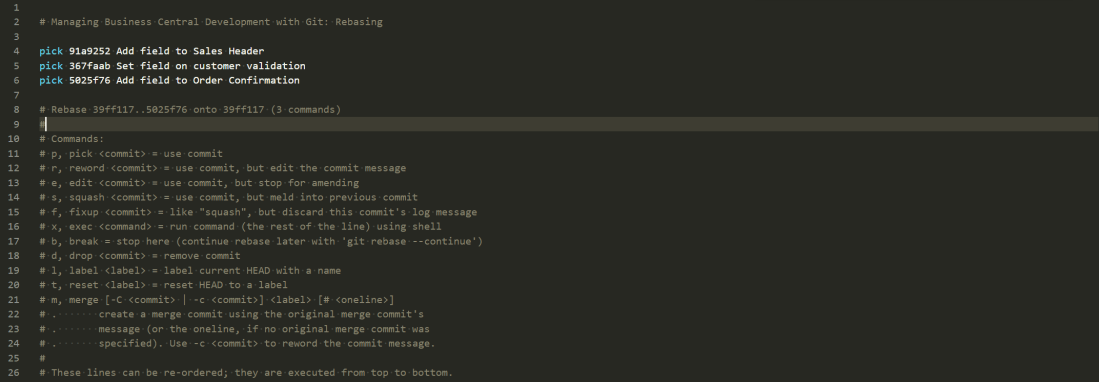
We learnt last time that one solution to the problem would be to interactively rebase the feature branch on top of master and remove the bug fix commit from the rebase script.
pick 440e851 Animal table and page
pick d80589c Ranger table and page
pick 45494f5 Bookings
pick 825e0ac Vehicles
pick c123f06 The bug fix <-- YOU COULD REMOVE THIS LINE FROM THE SCRIPT
Reset
Alternatively you could use reset. Resetting a branch allows you to force it to point at a different commit. Remember, a branch is just pointing to a commit. It can point somewhere else if you want.
git checkout feature/some-great-new-feature
git reset 825e0ac
This will check out the feature branch and force it to point to commit 82530ac. You’ll notice that it leaves the changes between the commit it has come from and its new commit in the working folder. If you don’t want that you can add –hard to the command. That will tell Git to force the branch to point to the new commit and to hell with any consequences.
Resetting to a Forced Push
Another scenario you might want to reset is when a colleague has force pushed some changes to a branch. Perhaps they’ve rebased the branch and force pushed the changes to the server. Now you’ve got a local copy of the branch that no longer matches the remote copy. Here’s an example:
* f48d506 (origin/feature/some-great-new-feature) Animal table and page
* 9e96653 Vehicles
* d6dbbaf Bookings
* 473781f Ranger table and page
| * 825e0ac (HEAD -> feature/some-great-new-feature) Vehicles
| * 45494f5 Bookings
| * d80589c Ranger table and page
| * 440e851 Animal table and page
|/
* 3894d1a (origin/master, origin/HEAD, master) Correct typo in caption
* cd03362 Add missing caption for new field
* 94388de Populate new Customer field OnInsert
* c49b9c9 Add new field to Customer card
My copy of feature/some-great-new-feature is shown in the middle of the graph (commit 825e0ac). Meanwhile a colleague has reordered the commits and force pushed. The remote branch origin/feature/some-great-new-feature is now pointing at commit f48d506. I’m not going to be able to push any changes to the branch while my repository is in this state.
This kind of disruption is why you should be careful force pushing your changes to the server – but is sometimes necessary. If I’m confident that I’m not going to lose any work, all I want to do is force my local branch to point to the same commit as the server. We’ve just learnt that reset will do that.
If you want to preserve your changes locally – just in case you do have something locally that isn’t on the server – you can just create a new branch at the same point. When you’re sure you don’t need those commits you can delete that branch.
git checkout feature/some-great-new-feature
git branch backup feature/some-great-new-feature
git reset origin/feature/some-great-new-feature --hard
After running those commands the graph looks like this. My local feature branch now matches the server and I’ve got a new backup local branch which I can always check out if I need to.
* f48d506 (HEAD -> feature/some-great-new-feature, origin/feature/some-great-new-feature) Animal table and page
* 9e96653 Vehicles
* d6dbbaf Bookings
* 473781f Ranger table and page
| * 825e0ac (backup) Vehicles
| * 45494f5 Bookings
| * d80589c Ranger table and page
| * 440e851 Animal table and page
|/
* 3894d1a (origin/master, origin/HEAD, master) Correct typo in caption
* cd03362 Add missing caption for new field
* 94388de Populate new Customer field OnInsert
* c49b9c9 Add new field to Customer card
Next Time
That’s a few concepts about managing branches, amending history, rebasing and cherry-picking. Next time we’ll combine some of these concepts to discuss managing a Business Central app in all its different flavours, for different versions of BC and the branching strategy that we currently use and why.