Debugging the Next Session in Business Central

Business Central v15 includes some good new stuff for developers. Access modifiers for objects, smarter code analysis, background page tasks – there is a list of stuff here: https://docs.microsoft.com/en-us/dynamics365-release-plan/2019wave2/dynamics365-business-central/developer-tools

I’ve just been trying out the new debugger capability, specifically being able to attach the debugger to a service and debug the next session to hit a breakpoint or error.

A Brief Nostalgia Trip…

Excuse me if I indulge in a little nostalgia. If you don’t care about this and just want to know how it works then you can skip to “spare me the history lesson”.

The Classic Client Years

Still here? Then maybe you have been around NAV long enough to remember the introduction of the RoleTailored Client. We’d been used to having the Classic Client debugger for years. It wasn’t perfect, but we knew our way round it. We could easily switch between writing and debugging code, debug an application server or even debug a posting routine in live and lock the whole system – anyone else do that when they first started in support? Life was good.

The RoleTailored Client Years

Then the RoleTailored Client was introduced and it felt like we were developing with one arm tied behind our backs. No debugger. You could still debug in Classic Client but the clients weren’t necessarily even running the same C/AL code – thanks to the ISSERVICETIER keyword.

I know you could find the source that the service tier was actually running, attach Visual Studio to the Server.exe process and debug the C# but not many people wanted to do that. MESSAGE debugging was far more common. Especially entertaining if someone left a message box in live and you got a call from the customer wondering what some mysterious pop-up was about. Connoisseurs wrapped their MESSAGEs in

IF USERID = 'sa' THEN...

By NAV 2013, RTC was the only client customers could use and we had to be able to debug. To be fair, Microsoft came up with the goods and the new debugger was better than what we used to have in the Classic Client. Especially because we could debug other sessions connected to the same service tier or the next session to connect. Ask the user to repeat the steps that lead to error and debug their session, perfect. Also great for debugging web service calls.

The Business Central Years

And then along came Business Central. The RoleTailored Client, complete with debugger is going to be removed and we don’t quite have a replacement for everything we rely on it for. Sound familiar?

Don’t get me wrong, I love VS Code. I love the VS Code debugging experience. But how can I debug other user sessions? How can I debug web service calls?

Spare me the History Lesson, How Does it Work?

Open up launch.json and hit the Add Configuration button in the bottom right hand corner and you’ll notice a couple of new options:

  • Attach to the next client on the cloud sandbox
  • Attach to the next client on your server

Pick one of those and you’ll notice that the configuration it creates has a request value of attach.

breakOnNext determines the type of session that the debugger will be attached to: Background, WebClient or WebServiceClient.

Give the configuration a sensible name so that you’ll be able to refer to it when you attach the debugger. Attach the debugger by opening the debug pane, selecting your configuration and click on the Start Debugging button.

Set some breakpoints in your code and hit them. Either with some activity in the web client or with a web service call.

BreakOnNext Support

Note: the help for breakOnNext states “The sandbox version only supports attaching to a WebService Client”. This seems to apply to sandbox Docker containers (e.g. from mcr.microsoft.com/businesscentral/sandbox) as well as to cloud sandboxes. You can, however, use the other breakOnNext options with an on-premise Docker image (mcr.microsoft.com/businesscentral/onprem).

Dynamics 365 Business Central Queries: Erm…where are the rest of my rows?!

This is a bit off-topic to what I’ve been blogging about lately but I’ve been caught out by this before and the other day so was a colleague so I thought it was worth a post.

TL;DR

Be careful of the difference between DataItemLink and DataItemTableFilter properties. DataItemLinks define the join between the dataitems in the query while DataItemTableFilters are applied to the results after the join has been processed.

Intro

In theory the query object in Business Central/NAV ought to be very useful. Instead of using nested REPEAT…UNTIL loops like we used to with the associated many round-trips to the database (or at least the cache) we should be able to create a query to join multiple tables and return all the columns we need in a single round-trip.

In practice, I’ve often found queries frustrating to work with. Sometimes because they can’t support a more complex scenario, sometimes because the parameters don’t do quite what I’d expect. Maybe my expectations are wrong. Fine, but even so, trying to “debug” a query and figure out why the query you have designed gives the results that you are getting is not fun. Not quite as bad as developing reports – but still not fun.

Scenario

Let’s imagine that for some reason we need a list of items with the total base quantity from sales invoice lines – including where that total is zero. Typically you might write some code like this:

SalesLine.SetRange("Document Type",SalesLine."Document Type"::Invoice);
SalesLine.SetRange(Type,SalesLine.Type::Item);

if Item.FindSet() then
  repeat
    SalesLine.SetRange("No.",Item."No.");
    SalesLine.CalcSums("Quantity (Base)");

    //use that result for something...

  until Item.Next() = 0;

You figure that doing a CalcSums() for each item probably isn’t going to perform too well. Surely, this is exactly the sort of thing that we have queries for?

Version One

Knowing that we need all items records, including ones that don’t have corresponding sales line records we are going to need a left join i.e. all records from table A and matching records from table B.

For starters I’m going to create a query that just shows the data we’ve got – no grouping or summing just yet.

query 50100 "Frustrating Query"
{
    QueryType = Normal;
    elements
    {
        dataitem(Item; Item)
        {
            column(No; "No.") {}
            column(Description; Description) {}

            dataitem(Sales_Line; "Sales Line")
            {
                SqlJoinType = LeftOuterJoin;
                DataItemLink = "No." = Item."No.";
                
                column(Document_Type;"Document Type") {}
                column(Document_No;"Document No.") {}
                column(Quantity;"Quantity (Base)") {}
            }
        }
    }
}

The first few results from that query look like this.

No.DescriptionDocument TypeDocument No.Quantity
1896-SATHENS DeskInvoice1022011
1900-SPARIS Guest Chair, blackQuote0
1906-SATHENS Mobile PedestalQuote0
1908-SLONDON Swivel Chair, blueQuote0
1920-SANTWERP Conference TableOrder1010038
1920-SANTWERP Conference TableInvoice1022024
1920-SANTWERP Conference TableInvoice10220310
1920-SANTWERP Conference TableInvoice1022054

Version Two

Cool. Now we need to Sum the Quantity column. I’ll remove the Document No. as we don’t want to group by that. Change the query design to this:

query 50100 "Frustrating Query"
{
    QueryType = Normal;
    elements
    {
        dataitem(Item; Item)
        {
            column(No; "No.") {}
            column(Description; Description) {}

            dataitem(Sales_Line; "Sales Line")
            {
                SqlJoinType = LeftOuterJoin;
                DataItemLink = "No." = Item."No.";
                
                column(Document_Type;"Document Type") {}
                column(Quantity;"Quantity (Base)")
                {
                    Method = Sum;
                }
            }
        }
    }
}

Now the results are:

No.DescriptionDocument TypeQuantity
1896-SATHENS DeskInvoice1
1900-SPARIS Guest Chair, blackQuote0
1906-SATHENS Mobile PedestalQuote0
1908-SLONDON Swivel Chair, blueQuote0
1920-SANTWERP Conference TableOrder8
1920-SANTWERP Conference TableInvoice18

Version Three

Remember that we only wanted the sum of the base quantity for invoice lines. We’ve got a result for 1920-S order lines at the moment. That’s fine we can use the DataItemTableFilter to filter the Document Type.

At least, you’d think so. So would I…and we’d both be wrong. Adding DataItemTableFilter = “Document Type” = const(Invoice) to the query gives these results:

No.DescriptionDocument TypeQuantity
1896-SATHENS DeskInvoice1
1920-SANTWERP Conference TableInvoice18

Erm…where are the rest of my rows?!

Q: what has happened to items 1900-S, 1906-S and 1908-S?
A: there are no matching sales lines for those items

Q: but…that’s why we used a LeftOuterJoin. That should include items with no matching sales lines. I thought that was the point of specifying the join type?
A: yes, except DataItemTableFilter isn’t used as part of the join

Q: …eh?

Explanation

I expected, and maybe you did too, that DataItemTableFilter would be used to filter the Sales Line table before joining it to the Item table. It turns out that the join is processed first, respecting the DataItemLink properties, and the DataItemFilter property is used to filter the joined results afterwards.

In SQL terms the filters go into the HAVING clause and not the ON clause. We might have expected something like this:

SELECT Item.No_,
Item.Description,
SalesLine.[Document Type],
SUM(SalesLine.[Quantity (Base)]) AS Quantity
FROM [CRONUS International Ltd_$Item] AS Item
LEFT JOIN [CRONUS International Ltd_$Sales Line] AS SalesLine
ON SalesLine.No_ = Item.No_
AND SalesLine.[Document Type] = 2
GROUP BY Item.No_, Item.Description, SalesLine.[Document Type]

with SalesLine.[Document Type] = 2 forming part of the ON clause (the definition of the join between the tables). What you actually get is something like this:

SELECT Item.No_,
Item.Description,
SalesLine.[Document Type],
SUM(SalesLine.[Quantity (Base)]) AS Quantity
FROM [CRONUS International Ltd_$Item] AS Item
LEFT JOIN [CRONUS International Ltd_$Sales Line] AS SalesLine
ON SalesLine.No_ = Item.No_
GROUP BY Item.No_, Item.Description, SalesLine.[Document Type]
HAVING SalesLine.[Document Type] = 2

with a HAVING clause at the end which restricts the results after the tables have been joined. (The actual SQL queries you’ll see if you run SQL Server Profiler will be different – stuffed full of parameters and ISNULLs – but this is the general idea).

Conclusion

That was a long way of saying be careful how you use the DataItemTableFilter property – it might not do what you’re expecting. So how can you define an ON clause where the filter is a constant value not a field in another table? I don’t know.

As far as I can see as DataItemLink only allows you to define joins between field tables you’d need to engineer the data so that all of your joins are between fields and not constant values. I’d like to be wrong, but if I’m not this is a pretty big flaw is queries.

It’d be nice to be able add constant values into table joins for this kind of thing. While we’re wishing, it would be even better to be able to dynamically define queries at run-time, build and execute them on the fly. It seems I’m not the only one with a query wishlist: https://experience.dynamics.com/ideas/search-ideas/?q=queries&forum=e288ef32-82ed-e611-8101-5065f38b21f1

Building Microsoft Dynamics 365 Business Central Apps with Azure DevOps

Last time out we were discussing defining your build pipeline in a YAML file. That post was an intro to what pipelines are and the benefits of defining the tasks that it runs in a YAML file alongside your other source code. Now we’ll turn our attention to some Business Central specific considerations.

Objectives

We’re start by defining the key objectives of the build process:

  1. Download a particular version of the source AL code
  2. Create an appropriate Docker container to publish the app into and run the tests against (see below for more about what “appropriate” means in this context)
  3. Acquire the alc.exe compiler from the container and use it to compile the AL code into two apps (the main app and a dependent app that contains the tests)
  4. Acquire and install any necessary dependencies, install the main app and test app (see here)
  5. Execute the tests and export the results
  6. Upload test results, main app and test app to the build
  7. Remove the Docker container

Environment

Microsoft-hosted or self-hosted?

Microsoft give you a menu of different hosted build agents to execute your pipelines on and 1,800 minutes of build time per month for free. The obvious attraction of this option is not having to build and maintain your own infrastructure to run builds and you just pay for the time you use (assuming you exceed the free limit). The obvious downside is that you can’t prepare that environment as you’d like e.g. Docker images must be downloaded each time as part of the job. I can’t comment too much on this option as it isn’t something we’ve experimented with so far.

We host our own server that runs several build agents. The main driver for the decision at the time was that it allowed us to persist Docker images between builds (NAV images are approx. 15GB, although BC images are smaller) and save a substantial amount of time on each build.

Azure DevOps Build Agents

With smaller Docker images these days it ought to be increasingly feasible to run BC builds in a sensible amount of time.

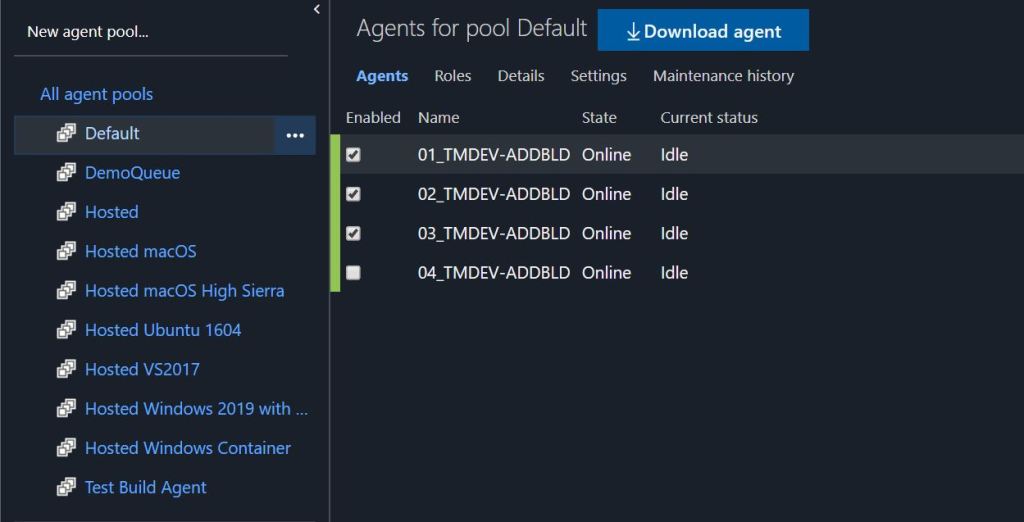
Installing and Connecting the Build Agent

From the list of build agents (at https://dev.azure.com/<your organisation>/_settings/agentpools) you’ll see the link to Download the agent. Simply download and extract onto your build server. Run config.cmd and follow the instructions to connect the agent to your DevOps organisation.

You’ll need a Personal Access Token to authenticate. See here if you need a refresher on how to create those.
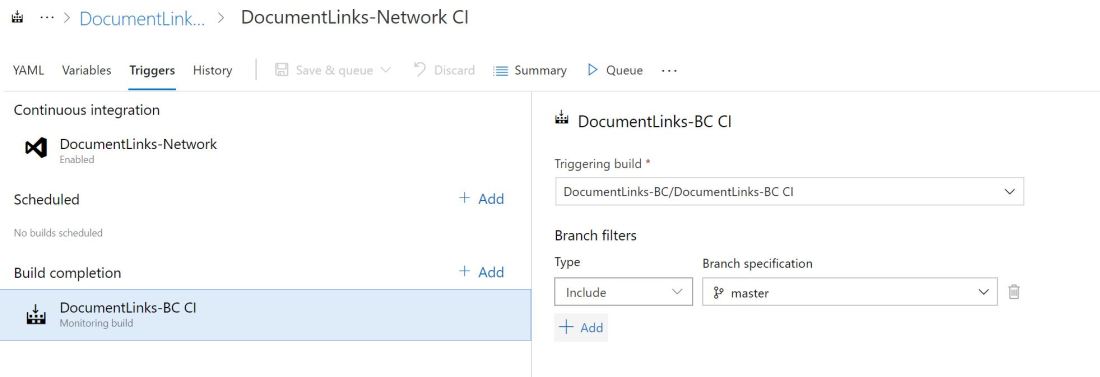
Triggers

The majority of our builds are triggered by some new code being pushed to server branch i.e. continuous integration builds. DevOps handles downloading this version of the source code to the build agent to work on. This is defined by the trigger section of the .azue-pipelines.yml file:

trigger:
  branches:
    include:
      - "*"

We are also starting to schedule more builds. This is useful for building our apps against insider builds of Business Central. Which brings me onto how we define the Docker image that we are going to build against.

Environment.json

Our apps include a json file that defines some parameters that are used by the build.

  • The Docker image to build against
  • The user name and password to create the new container with
  • Translations (country and language) that must be present in the app
  • Details of the Azure DevOps project/repo to acquire dependencies listed in app.json from (as described here)

Which Docker Image?

As a rule I develop and test against sandbox images (mcr.microsoft.com/businesscentral/sandbox). They are the closest thing to testing on SaaS that you can get without actually having a SaaS tenant. We always develop against the worldwide (W1) image and build against all of the localisations that we are planning to support.

The sandbox image has very little data in it, which is great for downloading new versions of the image and creating new containers but does mean that you have to handle more of the data setup in your tests than you would for an on-prem image. Yes, tests should be data-agnostic and run in an empty company but we still need to work around some bugs in standard library functions.

Branch per Docker Image

This approach allows us to have a separate branch for each different Docker image that we want to build our app against. We have country/xyz branches where “xyz” is the Docker tag for the localisation that we need to support i.e. country/es, country/ca, country/nz

At any moment these branches should be a single commit ahead of the feature branch we are working on, the only difference being the Docker image that is used. We can then rebase these branches on top of whichever commit we want to build. When we push those branches to the server continuous integration builds will be kicked off for each country.

PowerShell Tasks

It won’t come as much of a surprise that the majority of tasks performed by the build are PowerShell scripts. You’ve got some different options for defining these scripts:

  1. Define them in .ps1 files alongside your source code
  2. Define them in .ps1 files that are saved on the build server (assuming that you are self-hosting the agent)
  3. Maintain the scripts somewhere else and share them with the build server

We started with #2 and have recently moved onto #3. All our scripts are now bundled into a PowerShell module which is published on the PowerShell Gallery. The module is installed and updated on the build server. Maybe I’ll post some more about our approach to PowerShell development, our build process for it and testing with Pester another time.

We use inline PowerShell tasks to import our module and run a command on the source like this:

steps:
- task: PowerShell@1
  displayName: 'Create packages and execute tests'
  inputs:
    scriptType: inlineScript
    inlineScript: 'Import-Module Tecman.Tfs.Tools;Run-ALBuildProcess ''$(Build.SourcesDirectory)'' ''$(Build.ArtifactsStagingDirectory)'' $(Build.BuildID) $true'

Compiling the App

Acquiring the Compiler

If you’ve read the output from the creation of a new Docker container then you’ve probably noticed that the corresponding version of the Visual Studio Code extension is included with the container. It is hosted at http://<containername&gt;:8080/<name of vsix file>. You can get the precise URL to the file by inspecting the logs with docker logs <container name>.

Use PowerShell’s Download-File function to download the vsix to a local file. The .vsix file, like a .app file, is a archive file containing the source of the extension. You can use Expand-Archive on the file to extract the contents of the .vsix to a local folder and find alc.exe in the extracted files. You’ll need to rename the file to .zip first to convince Expand-Archive that it is a format it can expand.

function Get-CompilerFromContainer
{
    Param(
        [Parameter(Mandatory=$true)]
        [string]$ContainerName
    )

    $VsixPath = Get-VSCodeExtensionFromContainer -ContainerName $ContainerName
    if (!(Test-path "$VsixPath\Extract")){
        Rename-Item $VsixPath "$VsixPath.zip"
        Create-EmptyDirectory "$VsixPath\Extract"
        Expand-Archive -Path "$VsixPath.zip" -DestinationPath "$VsixPath\Extract"
    }
    
    "$VsixPath\Extract\extension\bin\alc.exe"
}

function Get-VSCodeExtensionFromContainer {
    Param(
        [Parameter(Mandatory=$false)]
        [string]$ContainerName = (Get-ContainerFromLaunchJson)
    )

    $Logs = docker logs $ContainerName
    $VsixUrl = $Logs.item($Logs.indexOf('Files:') + 1)
    $VsixName = (Split-Path $VsixUrl -Leaf).TrimEnd('.vsix')
    $VsixPath = Join-Path (Split-Path (Get-TFSConfigPath) -Parent) $VsixName
    $VsixFile = (Join-Path -Path $VsixPath -ChildPath $VsixName) + '.vsix'
    if (!(Test-Path $VsixPath)){
        New-Item -Path $VsixPath -ItemType Directory
        Download-File -sourceUrl $VsixUrl -destinationFile $VsixFile
    }

    $VsixFile
} 

The above includes some code to save the extracted .vsix files into the AppData folder on the build server to save us downloading and extracting a version of the VS Code extensions that we’ve already got. Over time the .vsix file has grown in size and we can save ourselves some time and disk space by reusing the copy that we’ve already extracted.

Compiling

Having got your hands on the right version of alc.exe you can run it with something like the below:

Start-Process -FilePath $CompilerPath -ArgumentList (('/project:"{0}"' -f $SourcePath),('/packagecachepath:"{0}"' -f (Join-Path $SourcePath '.alpackages')),('/assemblyProbingPaths:"{0}"' -f (Join-Path $SourcePath '.netpackages'))) -Wait

Assuming the app builds successfully you’ll see a .app file in the root of the source directory. You can now grab that app file and publish it into the container using the navcontainerhelper module.

Testing and Uploading the Results

Having created a container, got the VS Code extension and published the app (with any dependencies) it’s time to run the tests. I’ve been writing about using navcontainerhelper to execute the tests in the container quite a lot lately so I won’t go into all that again.

Suffice to say that we use navcontainerhelper to execute the tests and export the results to XUnit format. We then use the “Publish test results” task to upload those results to the build on Azure DevOps.

- task: PowerShell@1
  displayName: 'Error on test failure'
  inputs:
    scriptType: inlineScript
    inlineScript: 'Import-Module Tecman.Tfs.Tools;Error-OnTestFailure $(Build.BuildID)'

You might notice Error-OnTestFailure in that inlineScript. The purpose of that is to throw an error if any of the tests fail otherwise the build will be reported as successful, even with failed tests. I suspect setting the AzureDevOps parameter on the Run-TestsInNavContainer function is the better way to do this now though.

Uploading the App(s)

If the tests have run successfully then we can upload the app files to the build artefacts. Simply copy the app files into the artefacts directory – defined by the $(Build.ArtifactsStagingDirectory) variable and run the Publish Build Artifacts task.

- task: PublishBuildArtifacts@1
  displayName: 'Publish App Package'
  inputs:
    ArtifactName: 'App Package' 

Removing the Docker Container

Finally we’re going to remove the Docker container with a inline PowerShell script. Notice the condition property that is attached to this task. In this case we’re just defining that the task should always be run – even if an earlier task has failed. It is possible to get smarter with conditions e.g. only running certain tasks if the build has been triggered in a certain way, or from a particular branch.

- task: PowerShell@1
  displayName: 'Remove Docker build container'
  inputs:
    scriptType: inlineScript
    inlineScript: 'Import-Module Tecman.Tfs.Tools;Remove-ALBuildContainer $(Build.BuildID)'

  condition: always() 

Writing Your Own YAML Pipeline

If you’re reading this post and wondering how on earth you are supposed to know what to type into your blank .azure-pipelines.yml file then remember that the Azure Pipelines extension for VS Code give you intellisense. Just create the file and hit Ctrl+Space to see the what’s what.

Conclusion

This post has been a bit of mixed bag, a rummage through our build pipeline toolkit, but hopefully some of it has been useful. As ever, the best way to learn is to get stuck in and try it out for yourself.

Calling SOAP Services from PowerShell

Like most of my posts this has its origin in Microsoft Dynamics 365 Business Central development – specifically our build process – although it isn’t limited to that.

We had a need to call a SOAP web service from PowerShell (see below for the background if you’re interested). In the past I’ve used Invoke-WebRequest and added content-type and a SOAPAction header to the request. Similar to this.

Joel, one of the guys in my team introduced me to New-WebServiceProxy. Well…that’s been an oversight, it makes life so much simpler, as a quick example will illustrate. As the name suggests, PowerShell reads the definition of the service and creates a PowerShell object and complex types that you need to interact with it.

Invoke-WebRequest

First, this is the old, cumbersome way that I would have used to call a SOAP web service from PowerShell.

$Credential = [System.Management.Automation.PSCredential]::new('admin',(ConvertTo-SecureString 'P@ssword1' -AsPlainText -Force))
$Body = '<soapenv:Envelope xmlns:soapenv="http://schemas.xmlsoap.org/soap/envelope/" xmlns:sal="urn:microsoft-dynamics-schemas/page/salesorder">
<soapenv:Header/>
<soapenv:Body>
<sal:Read>
<sal:No>101005</sal:No>
</sal:Read>
</soapenv:Body>
</soapenv:Envelope>'
Invoke-WebRequest -Credential $Credential -Uri http://localhost:60799/NAV/WS/CRONUS%20International%20Ltd./Page/SalesOrder -Headers (@{SOAPAction='Read'}) -Method Post -Body $Body -ContentType application/xml

Create a credential object, define the body (copied from the request created by SoapUI) then call with Invoke-WebRequest setting the credential, content-type, headers and body.

New-WebServiceProxy

And now the enlightened way.

$Credential = [System.Management.Automation.PSCredential]::new('admin',(ConvertTo-SecureString 'P@ssword1' -AsPlainText -Force))
$Client = New-WebServiceProxy -Uri 'http://localhost:60799/NAV/WS/CRONUS%20International%20Ltd./Page/SalesOrder' -Credential $Credential
$Client.Read('101005')

Create the $Client object with New-WebServiceProxy and call the method that you are interested in. If you use PowerShell ISE you can browse the intellisense like a champion.

PowerShell WebService Proxy Intellisense.JPG

If the service uses complex data types you’ll find that PowerShell has auto-generated the types for you to access them. Look under [Microsoft.PowerShell.Commands.NewWebServiceProxy.AutogeneratedTypes…] – you could use it with Business Central services that take an xmlport as a VAR parameter, for example (use the [ref] keyword in PowerShell).

What Are You Calling SOAP for Anyway?

If you’re only interested in the PowerShell details you can stop reading now – thanks for your attention.

If you’re still here then I’ll explain why we’re doing this. As part of our build process for AL apps we need to prepare the DEFAULT test suite with the test codeunits and methods that we want to run. We then run the tests with Run-TestsInNavContainer in the navcontainerhelper module.

We used to import a codeunit from a text file and use Invoke-NavContainerCodeunit to call its methods. In the last few builds of Business Central some bug in the platform has stopped this working.

Freddy posted here about installing an app and calling its API as a replacement for importing fob files. Inspired by that, we’ve done the same. Publish an app that includes a codeunit exposed as a web service and call that service to prep the test suite.

Perhaps we should have used an API page and REST instead? I don’t know if there are any strong arguments either way. This particular cat can be skinned in several different ways (I wonder how that idiom translates to non-UK readers).

Chaining Builds in Azure DevOps

We are triggering a lot of builds in Azure DevOps these days. If anyone so much as looks at an AL file we start a new build.

OK, that’s a small exaggeration, but we do use our build pipelines for:

  • Continuous integration i.e. whenever code is pushed up to Azure DevOps we start a build
  • Verifying our apps compile and run against different localisations (more of that another time)
  • Checking that a dependent app hasn’t been broken by some changes (what we’re going to talk about now)
  • Building our app against different upcoming versions of Business Central (this is an idea that we haven’t implemented yet)

Background Reading

If you haven’t got a clue what I’m talking about you might find a little background reading useful. These might get you started:

Overview

We’re considering a similar problem to the one I wrote about in the last post on package management – but from the other end. The question then was, “how do I fetch packages (apps) that my app depends on?” Although not explicitly stated, a benefit of the package management approach is that you’ll find out pretty quickly if there are any breaking changes in the dependency that you must handle in your app.

Obviously, you want to minimise the number of times you make a breaking change in the first place but if you can’t avoid it then change the major version no. and do your best to let any dependent devs know how it will affect them e.g. if you’re going to change how an API works, give people some notice…I’m looking at you Microsoft 😉

But what if we’re developing the dependency and not the dependent app? There will be no trigger to build the dependent app and check that it still works.

Chaining Builds

Azure DevOps allows you to trigger a new build on completion of another build. In our scenario we’ve got two apps that are built from two separate Git repositories in the same Azure DevOps project. One is dependent upon the other.

It doesn’t really matter for the purposes of this post what the apps do or why they are split into two but, for the curious, the dependent app provides a little slice of extra functionality for on-prem customers that cannot be supported for SaaS. Consequently the dependency (which has the core functionality supported both for SaaS and on-prem) is developed far more frequently than the dependent app.

Build Triggers.JPG

We want to check that when we push changes to the dependency that the dependent app still works i.e. it compiles, publishes, installs and the tests still run.

You can add a “Build Completion” trigger to pipeline for the dependent app. This defines that when the dependency app is built (filtered by branch) that a build for the dependency kicks off.

That way if we’ve inadvertently made some breaking change we gives ourselves a chance to catch it before our customers do.

Limitations

Currently the triggering and to-be-triggered build pipelines must be in the same Azure DevOps project – which is a shame. I’d love to be able to trigger builds across different projects in the same organisation. No doubt this would be possible to achieve through the API – maybe I’ll attempt it some day – but I’d rather this was supported in the UI.