Maybe everyone else is already doing this and I’m just slow on the uptake but Visual Studio Code has options to automatically format files at various points.
The AL extension for VS Code provides a formatter for .al files. You can run it manually with the Format Document command (Shift+Alt+F). This inserts the correct number of spaces between parameters and brackets, indents lines correctly and generally tidies the current document up.
You can have VS Code automatically format the document when pasting, typing and saving. Search for format in the settings.
These settings will be applied globally. Alternatively you can enable the formatting just for specific file types. Click on the AL link in the right hand corner of the status bar and choose “Configure AL language based settings…”
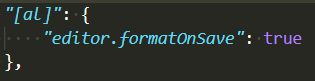
This opens the VS Code settings JSON file in your AppData folder (on Windows) and adds an [al] object to the file. Create the “editor.formatOnSave” and set its value to true to enable AL formatting when the files are saved. You can use intellisense (Ctrl+Space) to list the valid options in this file.
Apologies for another post about AL Test Runner. If you don’t use or care about the extension you can probably stop reading now and come back next time. It isn’t my intention to keep banging on about it – but the latest version (v0.2.1) does plug a significant gap.
Next time I’ll move onto a different subject – some thoughts about how we use Git to manage our code effectively.
Developing Against a Remote Docker Container
While I still prefer developing against a local Docker container I know that many others publish their apps to a container hosted somewhere else. In which case your options for running tests against that container are:
Using the Remote Development capability of VS Code to open a terminal and execute PowerShell on the remote host – discussed here and favoured by Tobias Fenster (although his views on The Beautiful Game may make you suspicious of any of his opinions 😉)
Enabling PS-Remoting and opening a PowerShell session to the host to execute some commands over the network – today’s topic
Again, shout out to Max and colleagues for opening a pull request with their changes to enable this and for testing these latest mods.
Enable PS Remoting
Firstly, you’re going to need to be able to open a PowerShell session to the Docker host with:
New-PSSession <computer name>
I won’t pretend to understand the intricacies of setting this up in different scenarios – you should probably read the blog of someone who knows what they are talking about if you need help with it.
The solution will likely include:
Opening a PowerShell session on the host as administrator and running Enable-PSRemoting
Making sure the firewall is open to the port that you are connecting over
Passing a credential and possibly an authentication type to New-PSSession
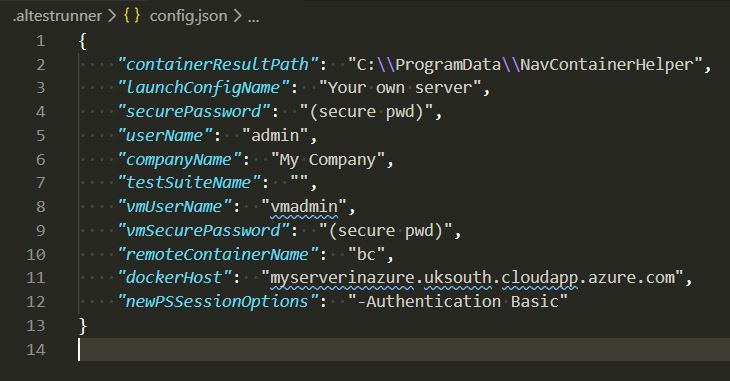
To connect to my test server in Azure I run the following:
They are several new keys in the AL Test Runner config file to accommodate remote containers. There are also a few new commands to help create the required config.
The Open Config File command will open the config JSON file or create it, if it doesn’t already exist. Set Container Credential and Set VM Credential can be used to set the credentials used to connect to the container and the remote host respectively.
The required config keys are:
Sample AL Test Runner config
dockerHost – the name of the server that is hosting the Docker containers. This name will be used to create the remote PowerShell session. Leaving this blank implies that containers are hosted locally and the extension will work as before
vmUserName / vmSecurePassword – the credentials used to connect to the Docker host
remoteContainerName – the name of the container to run tests against
newPSSessionOptions – switches and parameters that should be added to New-PSSession to open the session to the Docker host (see below)
The extension uses New-PSSession to open the PowerShell session to the Docker host. The ComputerName and Credential parameters will populated from the dockerHost and vmUserName / vmSecurePassword config values respectively.
Any additional parameters that must be specified should be added to the newPSSessionOptions config key. As in my case I run
I need to set newPSSessionOptions in the config file to “-Authentication Basic”. You can use this key for -useSSL, -Port, -SessionOption or whatever else you need to open the session.
With the config complete you should be able to execute tests, output the results and decorate the test codeunits as if you were working locally. Beautiful.
As ever, feedback, suggestions and contributions welcome. Hosted on GitHub.
We’ve had query objects for a while now – since NAV 2013 (I think). In theory they sound great, link a bunch of tables together, aggregate some columns, get distinct values, left join, right join, cross join – executed as a single SQL query.
Why Don’t We Use Queries Much?
In practice I haven’t seen them used that much. There’s probably a variety of reasons for that:
We have limited control over the design and execution of the query at runtime. The design is pretty static making it difficult to create useful generic queries short of throwing all the fields from the relevant tables in – which feels heavy-handed
It isn’t easy to visualise the dataset that you are creating when writing the AL file
Habit – we all learnt FindFirst/Set, Repeat and Until when we first started playing with CAL development and are more comfortable working with loops than datasets. Let’s be honest, the RDLC report writing experience hasn’t done much to convert us to a set-based approach to our data
However, just because there is room for improvement doesn’t mean that we can’t find good uses for queries now. Queries are perfect for:
Aggregates – min, max, sum, average, count – especially for scenarios that aren’t suited to flowfields
Date functions – convert date columns to day/month/year – which allows you to easily aggregate another column by different periods
Outer joins – it’s possible, but far more expensive, to create this kind of dataset by hand with temporary tables
Selecting the top X rows
Exposing as OData web services
It’s the last point in that list that I particularly want to talk about. We’ve been working on a solution lately where Business Central consumes its own OData web services.
What?! What kind of witchcraft is this? Why would you consume a query via a web service when you can call it directly with a query object? Hear me out…
Consuming Queries
I think you’ve got two main options for consuming queries via AL code.
Query Variable
You can define a variable of type query and specify the query that you want to run. This gives you some control over the query before you execute it – you can set filters on the query columns and set the top number of rows. Call Query.Open and Query.Read to execute the query and step through the result set.
The main downside is that you have to specify the query that you want to use at design-time. That might be fine for some specific requirement but is a problem if you are trying to create something generic.
Query Keyword
Alternatively we can use the Query keyword and execute a query by its ID. Choose whether you want the results in CSV (presumably this is popular among the same crowd that are responsible for an increase in cassette tape sales) or XML and save them either to disk or to a stream.
The benefit is that you can decide on the query that you want to call at runtime. Lovely. Unfortunately you have to sacrifice even the limited control that a query variable gave you in order to do so.
OData Queries/Pages
Accessing the query via OData moves us towards having the best of both worlds. Obviously there is significant extra overhead in this approach:
Adding the query to the web service table and publishing
Acquiring the correct URL to a service tier that is serving OData requests for your query
Creating the HTTP request with appropriate authentication
Parsing the JSON response to get at the data that you want
This is significantly more work than the other approaches – let’s not pretend otherwise. However, it does give you all the power of OData query parameters to control the query. While I’ve been talking about queries up til now almost all of this applies to pages exposed as OData services as well.
$filter: specify column name, operator and filter value that you want to apply to the query, join multiple filters together with and/or operators
$select: a comma-separated list of columns to return i.e. only return the columns that you are actually interested in
$orderBy: specify a column to order the results by – use in combination with $top to get the min/max value of a column in the dataset
$top: the number of rows to return
$skip: skip this many rows in the dataset before returning – useful if the dataset is too large for the service tier to return in a single call
$count: just return the count of the rows in the dataset – if you only want the count there is no need to parse the JSON response and count them yourself
I’ve written an extension for VS Code to help run your AL tests in local Docker containers. Search for “AL Test Runner” in the extension marketplace or click here. Feedback, bugs, feature suggestions all gratefully received on the GitHub repo or james@jpearson.blog
Intro
As soon as Freddy added capability to the navcontainerhelper module to execute automated tests I was excited about the potential for:
Making test execution in our build pipeline simpler and more reliable
Running tests from Visual Studio Code as part while developing
I’ve written about both aspects in the past, but especially #1 recently – about incorporating automated tests into your Azure DevOps pipeline.
This post is about #2 – incorporating running tests as early as possible into your development cycle.
Finding Bugs ASAP
You’ve probably heard the idea – and it’s common sense even if you haven’t – that the cost of finding a bug in your software increases the later in the development/deployment cycle you find it.
If you realise you made a silly mistake in code that you wrote 2 minutes ago – there’s likely no harm done. Realise there is a bug in software that is now live in customers’ databases and the implications could be much greater. Potentially annoyed customers, data that now needs fixing, support cases, having to rush out a hotfix etc.
We’ve all been there. It’s not a nice place to visit. I once deleted all the (hundreds of thousands of) records in the Purch. Rcpt. Line table with a Rec.DELETEALL on a temporary table…turns out it wasn’t temporary…and I was working in the live database.
Writing automated tests can help catch problems before you release them out into the wild. They force you to think about the expected behaviour of the code and then test whether it actually behaves like that. Hopefully if the code that we push to a branch in Azure DevOps has a bug it will cause a test to fail, the artifacts won’t be published, the developer will get an email and the customer won’t be the hapless recipient of our mistake. No harm done.
However, the rising cost of finding a bug over time still applies. Especially if the developer has started working on something else or gone home. Getting back your head back into the code, reproducing and finding the bug and fixing it are harder if you’ve had a break from the code than if you went looking for it straight away.
Running Tests from VS Code
That’s why I’m keen that we run tests from VS Code as we are writing them. Write a test, see it fail, write the code, see the test pass, repeat.
I’ve written about this before. You can use tasks in VS Code to execute the required PowerShell to run the tests. The task gives you access to the current file and line no. so that you can fancy stuff like running only the current test or test codeunit.
AL Test Runner
However, I was keen to improve on this and so have started work on a VS Code extension – AL Test Runner.
Running the current test with AL Test Runner and navcontainerhelper
The goals are to:
Make it as simple as possible to run the current test, tests in the current codeunit or all tests in the extension with commands and keyboard shortcuts
Cache the test results
Decorate test methods according to the latest test results – pass, fail or untested
Provide extra details e.g. error message and callstack when hovering over the test name
Add a snippet to make it easier to create new tests with placeholders for GIVEN, WHEN and THEN statements
Important:this is for running tests with the navcontainerhelper PowerShell module against a local Docker container. Please make sure that you are using the latest version of navcontainerhelper.
Getting Started
Download the extension from the extension marketplace in VS Code and reload the window.
Open a folder containing an AL project
Open a test codeunit, you should notice that the names of test methods are decorated with an amber background (as there are no results available for those tests)
The colours for passing, failing and untested tests are configurable if you don’t like them or they don’t fit with your VS Code theme. Alternatively you can turn test decoration off altogether if you don’t like it
Place the cursor in a test method and run the “AL Test Runner: Run Current Test” command (Ctrl+Alt+T)
You should be prompted to select a debug configuration (from launch.json), company name, test suite name and credentials as appropriate (depends if you’re running BC14 or BC15, if you have multiple companies, authentication type etc.)
I’ve noticed that sometimes the output isn’t displayed in the new terminal when it is first created – I don’t know why. Subsequent commands always seem to show up fine 🤷♂️
Use the “ttestprocedure” to create new test methods
.gitignore
If you’re using Git then I’d recommend adding the .altestrunner folder to your .gitignore file:
.altestrunner/
Committing the config file and the test results xml files doesn’t feel like a great idea.
Obsession is probably a little strong, but I do like tidy code. You know – proper indentation, a sensible number of comments (which can be more than none but there shouldn’t be as much comment as code) and good names. Hungarian notation brings me out in a rash.
This extends to having keywords, variables and methods in the right case. While in CAL there was a lot of UPPERCASE, in AL there is far more lowercase. It took me a while to get used to but I prefer it now.
If you convert some CAL into AL then likely all the keywords are going to be in uppercase. The code will run fine, it just doesn’t look nice. In the below example my eye is drawn to the fact that some filters are being set, rather than what those filters are – on which records and fields.
You’ll notice that all the UPPERCASE words are highlighted in that example. That’s because they are all search results for my regular expression.
\b(?!NAV)(?!CACTMN)[A-Z]+\b
\b will match a word boundary – spaces, punctuation, start and end of lines – anything that denotes the start or end of a word
(?!) is a negative lookahead and does not find matches for the expression inside the brackets. This is useful for uppercase words that should be left uppercase like NAV or the AppSource suffix that you’ve added all over the place
Disclaimer: don’t ask me to explain lookaheads in any more detail than that – I don’t know. I’m not convinced that anyone actually properly knows how regex works 😉
[A-Z] matches uppercase characters between A and Z
+ indicates that we’re looking for one or more of the previous group i.e. one or more uppercase letters
Altogether it translate to something like: match any word of one or more uppercase letters except where it contains “NAV” or “CACTMN” (the suffix we’re using in this app).
Once you’ve found the matches find and replace is your friend. I love how VS Code gives you a preview of all the replaces that it is going to do. Very useful before you replace “IF” with “if” and realise you’ve also replaced “MODIFY” with “MODifY”.