Why do all my tests show up twice in the test explorer?

Long story, short

Because you are using the pre-release of AL Language and you also have AL Test Runner installed. If you are using AL Test Runner then you probably want to switch to the release version of the AL Language extension for now.

Short story, made unnecessarily long

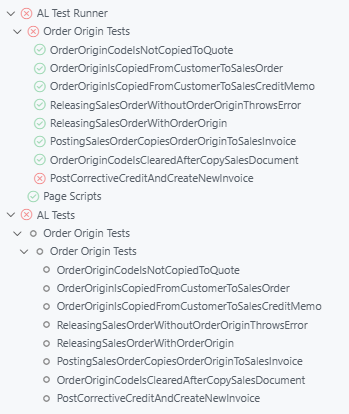
Microsoft are adding testing capability to the AL Language extension. It now discovers the tests in your project and puts them into the test explorer.

If you are using BC28 then the AL Language extension can connect to the server to run the tests (and maybe also debug them judging by the fact that option now shows up in the test explorer).

In the latest versions of AL Test Runner I have changed the name of the test controller to “AL Test Runner” to make it clearer what’s going on. “AL Tests” is the test tree created by the AL Language extension.

I’ve been fine working with both side-by-side for a few months, but recently I’ve had a problem where the test run never ends…

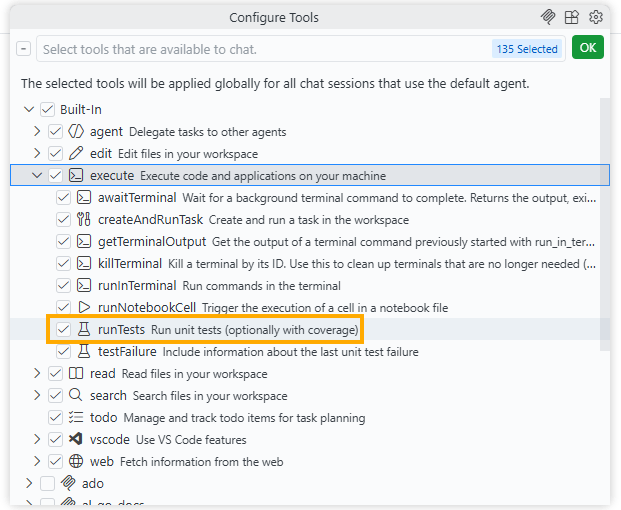
That’s especially annoying if you are using Copilot in VS Code and having it run tests while it is generating code. (If you’re not already doing that then you should definitely consider it, maybe I’ll blog about that at some point, in the meantime check out the #runTests Built-in tool that you can point your conversation/model at).

I think this is a bug in the AL Language extension when attempting to run tests against a pre-BC28 container i.e. a version of BC that doesn’t support the new testing execution. I’ve created a GitHub issue here: https://github.com/microsoft/AL/issues/8197

Unfortunately, if a test run for All Tests is started, either in the UI or by the AI model, then the AL Language test controller is triggered, which never finishes, which leaves the model waiting indefinitely for the test results (even after AL Test Runner has finished and retrieved the results).

What’s the future for AL Test Runner?

Now that Microsoft are adding more testing features what is going to happen to AL Test Runner?

For now, I’m going to maintain it as Microsoft’s version isn’t live and mine still has more features than Microsoft’s (code coverage, downloading performance profile, running page scripts). I expect Microsoft will add these features over time, I hope so.

At some point Microsoft’s extension will be feature-rich enough to retire AL Test Runner. I’ll keep you posted.

Export Test Steps as CSV to Import to Azure DevOps

I don’t know if anyone needs this. I’m not sure if even I need this yet, but I am starting to find it useful. We use test plans in Azure DevOps to record the steps and results of manual testing.

I figured that if I’m writing decent comments in my automated (integration*) tests then I should be able to just copy them to the test plan in DevOps, or at least use them as the basis.

Find your test (or test codeunit) in the testing tree, right click and export to CSV. That reads your //[GIVEN], //[WHEN] and //[THEN] lines and drops them into the right format to import into DevOps.

https://jimmymcp.github.io/al-test-runner-docs/articles/export-test-to-csv.html

Postscripts

*yes, I know, the terminology is off, don’t fight me. By “integration” tests I mean scenarios that resemble what the user is doing in the client**, as opposed to calling codeunits, table methods or field validations directly.

**although, without using TestPages. I’m not really trying to simulate user behaviour in the client, I’m trying to recreate the scenario – but these are automated tests and they should still run fast. Use the actual client and your actual eyes to test the client***.

***and maybe page scripts****

****which also now show up in your test tree when you save the yml export into your workspace.

Code Coverage Updates in VS Code with AL Test Runner

Intro

For a while now AL Test Runner has been able to download the code coverage details after running your tests, output a summary of the objects that were hit with some stats and then highlight the lines which were hit in the previous test run or the last time you ran all the tests. More in the docs.

Recently, VS Code has added an API for test extensions to feed data into and some UI to show the coverage. It’s pretty cool.

Test Coverage

The first thing you’ll notice is this “Test Coverage” panel which is displayed after the tests have run. It displays a tree of the ojbects which have been hit by the run and the percentage coverage (in statement coverage terms).

If you click on a file in the tree it will open the file in the editor and you will see lines which were hit highlighted in the gutter.

In fact, these highlights will continue to be shown as you navigate around your source code. I’m leaving the “Code Coverage: Off/Previous/All” item in the status bar as this highlights each whole line and is much easier to see if you want to zoom out and get an impression of coverage of the whole file.

Coverage from Previous Runs

Coverage from previous test runs is stored and can be accessed from the Test Results pane (usually shown at the bottom of the screen). It might be useful to switch between test coverage results for test runs to see how to coverage % has changed over time (with the usual caveat about not using code coverage as a target).

The decorations in the gutter to indicate which lines have been covered in the current file are only shown when the latest test coverage is being displayed. That makes sense because the code coverage detail is all based on line numbers. Once you’ve made some changes to a file those line numbers are obsolete.

Performance Profiling Tests with AL Test Runner

This is a feature that has been in AL Test Runner for a months now but I haven’t got round to blogging about it. I haven’t done much blogging or work on AL Test Runner for a while now. I started a new job at the start of the year and had more important stuff keeping me occupied, but Johannes (https://github.com/jwikman) has prompted me into some action with some contributions recently – thanks very much for that 🥳

Scenario

My original scenario was that we had some poorly performing code. Complex code. Complex code I hadn’t been involved with much before. Complex code that would be easy for me to break functionally, while trying to improve the performance.

My first task was to surround the code with some integration tests. I find this an effective way to learn some existing code. You have to learn how to construct the GIVENs – what is the data structure and what setup is required for each test? It also gives you an easy way to step through the code and see what’s going on when certain processes are run. Crucially it also gave me some confidence that I wasn’t completely screwing up the app that I was working on while I was changing it.

Comparing Performance

OK, so I’ve got some tests to validate the functional behaviour before and after my changes, but what about performance? We have the Performance Toolkit, but I think that is less about the performance of a single process and more about concurrency. The obvious choice is to use the Performance Profiler.

I wanted to leave the existing code paths intact and just use a setup field as a rudimentary feature flag to switch between the old code and the new code. But, I didn’t want to be opening the client to run the performance profiler page or initialize and download snapshot profiles in between each test. I wondered if it was possible to could automate capturing a profile and downloading it to the workspace somehow.

It was 🙂

Setup

There is a new setting “Enable Performance Profiler” which defaults to true. This uses some new functions in the Test Runner Service app. With each test run the performance profile is captured and downloaded to the .altestrunner folder in your test project.

This should all be handled automatically. The Test Runner Service app should be downloaded when required and the serviceUrl in the config file set automatically. Check the docs for the required setup if not though.

Use

There is a new icon in the status bar which will open the performance profile viewer with the latest trace.

With this I could run two tests with the old and the new and compare the results side by side. If you want to do that just take a copy of the first trace file as it will be overwritten by the second test.

The trace, of course, has other benefits too. It is much easier to see the whole callstack and use the links on the right hand side to jump straight into the code. This also gives the potential for other features. I could maybe do something that allows you to choose two tests to run and download separate traces for them all in one action? Or read through the trace file to update the test coverage map? Let me know whether either of those sounds interesting or if you have other ideas or issues.

Pre-Releases & GitHub Actions for Visual Studio Code Extensions

Intro

This post is going to be a bit of a brain dump about developing my VS Code extension, branching strategy for pre-releases and releases and using GitHub actions to stitch it all together.

If you’re only here for the AL / Business Central content then you might want to give this one a miss. Then again, Microsoft are increasingly using GitHub for AL projects themselves (e.g. AL-Go for GitHub) – so it might be worth a look after all.

Objectives

What am I trying to achieve? I want to have a short turn around of:

  1. Have an idea for a new feature
  2. Implement the feature
  3. Test it and make it available for others to test
  4. Release

I use the extension pretty much every day at work so I am my own biggest customer. I want to write some new feature and start working with it in a pre-release myself to find any issues before I release it.

I also want to have a little fun with a side-project – learn a little typescript, practice some CI/CD, GitHub Actions and Application Insights. If anyone else finds the extension useful as well then that’s a bonus.

Overview

This is my workflow. I want to get the feature into the pre-release version of the extension on the marketplace quickly. That way I will get the new pre-release myself from the marketplace and use it in my daily work. I’ll make any fixes or improvements in updates to the pre-release before merging the code to the release version and publishing to the marketplace.

GitHub Actions

The GitHub actions definition is fairly self-explanatory. The yaml is bellow, or here if you prefer. Run whenever some code is pushed. Build, test, package with npm and vsce. Run the PowerShell tests with Pester. Upload the built extension as an artifact. If the pre-release branch is being built then use vsce to publish to the marketplace with the --pre-release switch.

The actions definition in the master branch is similar but publishes to the marketplace without the --pre-release switch.

name: CI

# Controls when the action will run. Triggers the workflow on push or pull request
# events but only for the master branch
on:
  push:
  pull_request:
    branches: [ master ]
  workflow_dispatch:

jobs:
  build:
    runs-on: windows-latest

    steps:
      # Checks-out your repository under $GITHUB_WORKSPACE, so your job can access it
      - uses: actions/checkout@v2

      - name: npm install, build and test
        run: |
          npm install
          npm run build
          npm test
      - name: package with vsce
        run: |
          npm install -g vsce
          vsce package
      - name: run pester tests
        shell: pwsh
        run: |
          Set-PSRepository psgallery -InstallationPolicy Trusted
          Install-Module Pester
          Install-Module bccontainerhelper
          gci *ALTestRunner.psm1 -Recurse | % {$_.FullName; Import-Module $_.FullName}
          Invoke-Pester
      - name: Upload a Build Artifact
        uses: actions/upload-artifact@v2.1.4
        with:
          name: AL Test Runner
          path: ./*.vsix

      - name: Publish to marketplace
        if: github.ref == 'refs/heads/pre-release'
        run: |
          vsce publish -p ${{ secrets.VSCE_PAT }} --pre-release

The personal access token for my Visual Studio account (used to publish to the marketplace) is stored in a repository secret.

Repository secrets

You can create and update these from the settings for the repository. You can read more about creating the personal access token and the option for publishing extensions to the marketplace here: https://code.visualstudio.com/api/working-with-extensions/publishing-extension

Conclusions

It is rewarding to make some changes to the extension, push them to GitHub and then 10-15 minutes later be able to use them in a new version of the extension which has been automatically published, downloaded and installed. It allows you to publish more frequently and with more confidence.